ECU Remapping and Tuning for cars, utes, vans and light commercials.
ECU Remapping (aka ECU Tuning or Chip Tuning) is the latest, most cost effective way to get the best from your vehicle. It involves using special tools to read the original file MAP file from within the Micro chip of your vehicles ECU, editing certain parameters within the file using specialised computer software to a point that is still within the engine's working limit, and then writing that file back into your ECU.
Different tuning or remapping options require much knowledge of each parameter stored within the MAP file and many hours of training is required to be able to understand how to safely enhance a vehicles performance and how to make sure power levels are are not exceeding the limitations of the engine.
Many online companies sell "off-the-shelf" tune files which are one size-fits-all type files and many are made overseas. This means that not only is the file not optimised for your particular vehicle, but it is also not suited to Australian climates, fuel quality or air density. This can lead to issues in a few years time.
Other companies offer Add-On modules that simply plug-&-play via either the OBD port or via a custom harness that plugs into certain engine sensors from a small module that is then secured in the engine bay. Whilst these add-on modules are slightly cheaper and easy for the DIYers, they too are not optimised to suit your engine. They work by simply modifying the readings sent to the ECU and tricking the ECU into accelerating harder giving the effect of having extra power. While this works well, It doesn't compensate for other factors controlled by the ECU and will lead to premature wear and tear of various components.
Professional ECU remapping adjusts all required parameters in order for all components to work as they should and in harmony with each other. This is why remapping is the best and safest way to gain more horsepower and torque. We are proud to announce that we can now offer several types of remapping solutions, 100% custom made and suited to your vehicle. We take into account the age and mileage of the engine, along with the condition of the internal components and customise the file accordingly.
Find a Remapping Solution below to suit your needs.
Here is a list of some of our tuning and remapping solutions.
- Stage 1 Tuning
- Stage 2 Tuning
- Crackle/Pops & Bangs
- Start/Stop System Disable
- AdBlue Delete / Lowered AdBlue Consumption
- DPF Delete
- EGR Delete
- Throttle Valve Controller (TCV) Off Map
- Intake Port Shutoff Valve Delete
- O2 Sensor Delete
- Cat Delete
- Diesel Hardcut/Popcorn Map
- Launch Control
and more...
Please note that some tunes/maps are not possible on some vehicles and may not be able to be performed on your vehicle. Contact us if you would like to know more about a certain Tune or Map file edit.
For bookings or more info, contact us using any method on our Contact page.
Exciting news for those looking for chip tuning and performance remapping
ECU Tuning or Remapping is becoming more and more popular in the automotive world and not just for enhancing power. It can be used for a variety of other things including removing entire systems from a vehicle to erasing a certain DTC (Diagnostic Trouble Code) to disable the engine warning light illuminating on your dash board following a certain modification.
With the craziness of this year and the mad rush towards the finish line, we took the time to learn, practice and extend our services to our customers. In October we finalised all our training and received our tools to now be able to offer ECU chip tuning and performance remapping as part of our list of services.
Remapping or chip tuning your ECU is the most cost effective way of enhancing the performance of your car, ute, van or light commercial vehicle. Whether it's stock or modified, further power can always be gained by editing the software in the ECU (Electronic Control Unit) known as "maps". By carefully editing the software of your ECU, we are able to extract any gains available whilst keeping it safe and reliable.
Removal of anti-polution systems help dedicated off-road diesel vehicles benefit from chip tuning. By removing the DPF, EGR, SCR and/or AdBlue systems via remapping and physically removing the restriction of the DPF from the exhaust system, allows the tuner to extract further power thanks to the better flow of exhaust gasses.
Together with "Euro Chiptuning Solutions", we can now offer our customers Stage 1 - 2 performance tuning, DPF/EGR/SCR/AdBlue delete maps, Start/Stop system disable, DTC (Fault code) removal, Crackle maps, Launch control and much more.
All maps are 100% custom and not "off-the-shelf" files readily available online. Each map is made specifically for your vehicle and is suited for Australian conditions and fuel. This provides reliability and safety. Our prices are extremely competitive and if you're not 100% happy with the tune, we can certainly make the necessary changes to make sure you are completely satisfied.
For more info, please contact us by phone or email, or visit the Euro Chiptuning Website.
The Beginning
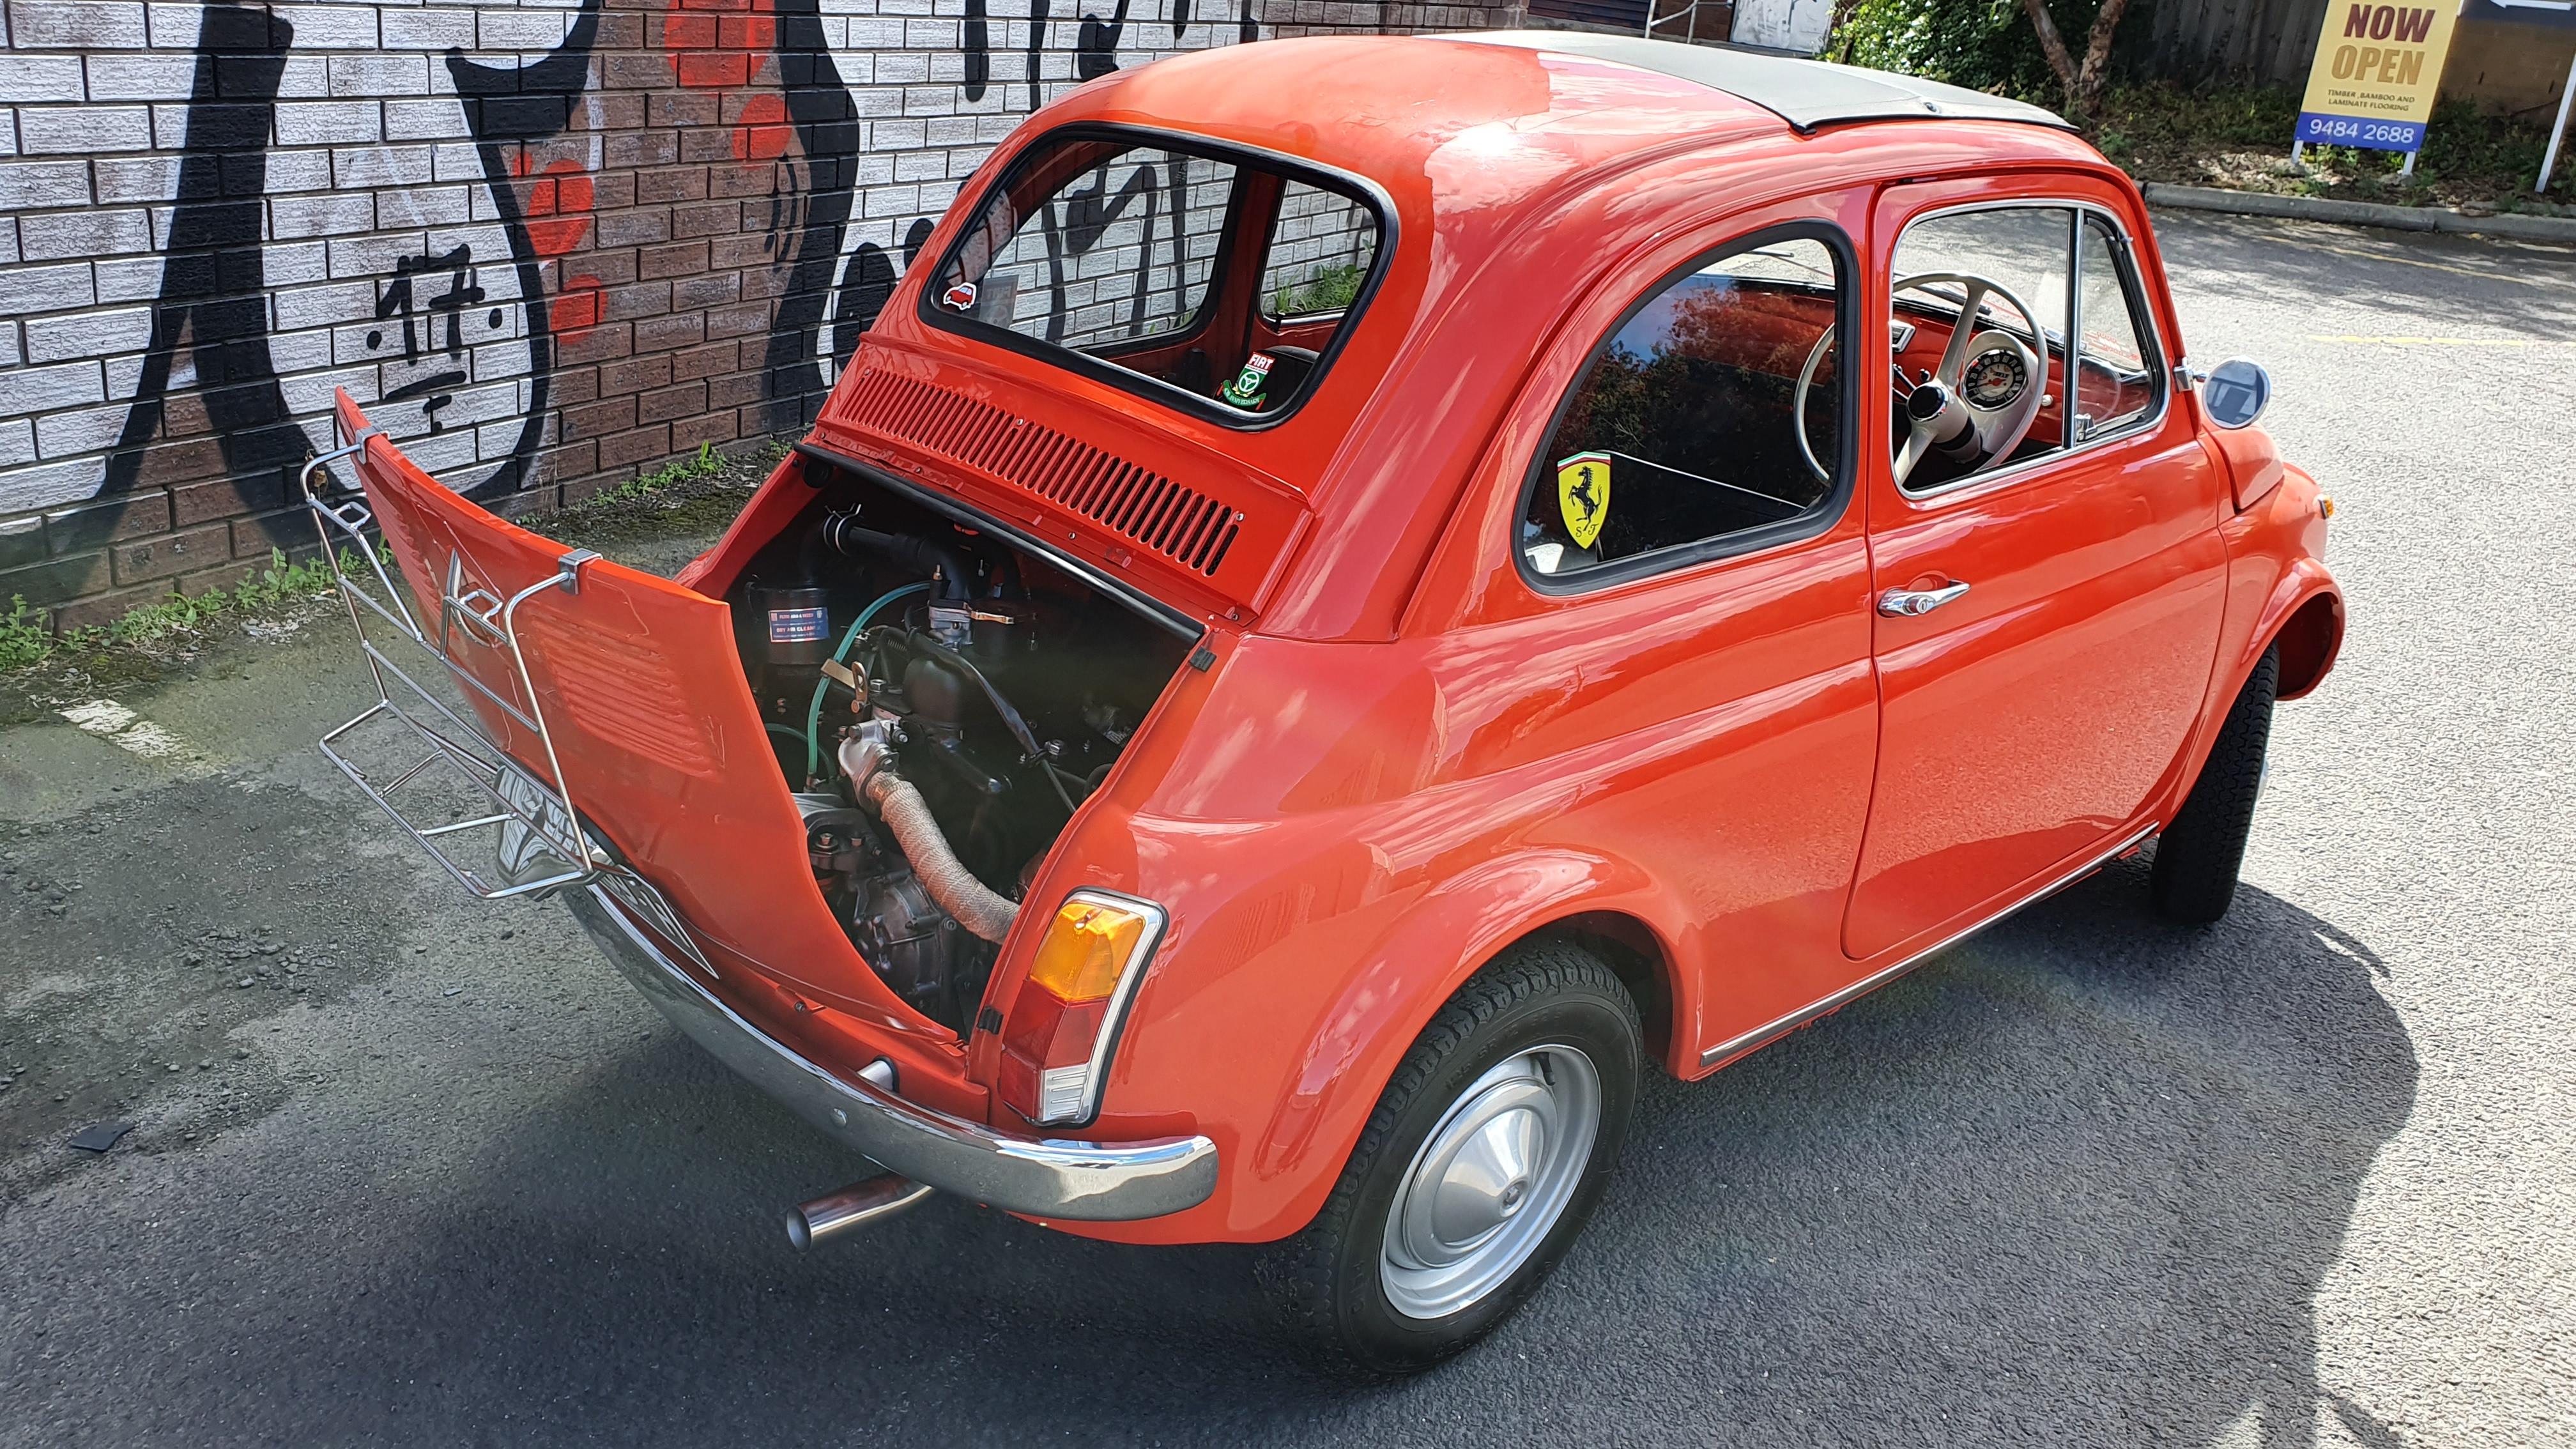
Our first experience with a rebuild of a Fiat 500F engine. It was April this year (2019) when Rob limped his award winning 1969 Fiat 500 into the workshop. The engine sounding like a twenty year old Victa lawnmower that had never received a tune-up. Though it certainly did look brand new.
An Italian icon and classic. This 1969 Fiat 500F 500cc engine rebuild was the biggest project of the year and it only has 2 cylinders!

The Original 110F engine in the bay of the Fiat when it arrived at the shop.
The Issue
Rob explained to us that the car never seemed to run correctly since he first purchased it and the problem gradually worsened with each drive. He had replaced various parts tryin to fix it without any luck. A one-way valve was installed Into the fuel line to prevent fuel leaking back to the tank when parked for a period of time and a new fuel pump was fitted at the same time. The original ignition system with points style distributor was replaced with a new "123ignition" electronic item and the coil, leads and plugs were also replaced to eliminate any possible spark issues. A new, original "Weber 26IMB" carburettor was also installed. Even though these upgrades didn't fix the problem, they were certainly needed for what was to come. The other upgrades that Rob had already carried out and would be needed were an all new synchronised gearbox and sports clutch and even though still in standard form, the entire 4 wheel drum braking system was overhauled with all new parts. Even though it still uses factory drums and has no help from a vacuum assisted booster, it was certainly an upgrade from the old, rusty setup.The Diagnosis
After chatting for a while, we proceeded to look over the car in the hope of diagnosing the issue. After getting the little 500cc running, it was clear that Rob's diagnosis was correct. There certainly was a misfire, but it wasn't an electrical one, nor was it a fuel/air mixture fault. A compression test confirmed the worst; cylinder 2 showed no signs of holding any air let alone compressing it. This now meant the head had to be removed to be able to find and fix the issue and after hearing the news and looking upset for no more than 5 seconds, Rob told us to get it fixed, no matter what the cost. He also wanted us to give it a bit more power if possible. A quick overhaul to freshen it up, with the addition of a sports camshaft for some added performance would have all the issues sorted quickly and easily. Well that was the initial plan anyway. This project just became the biggest job for the year, and with it having only 2 cylinders, we never would've guessed it. We had only 3 objectives to meet: Make it reliable, give it some more power & keep the engine and the car looking factory.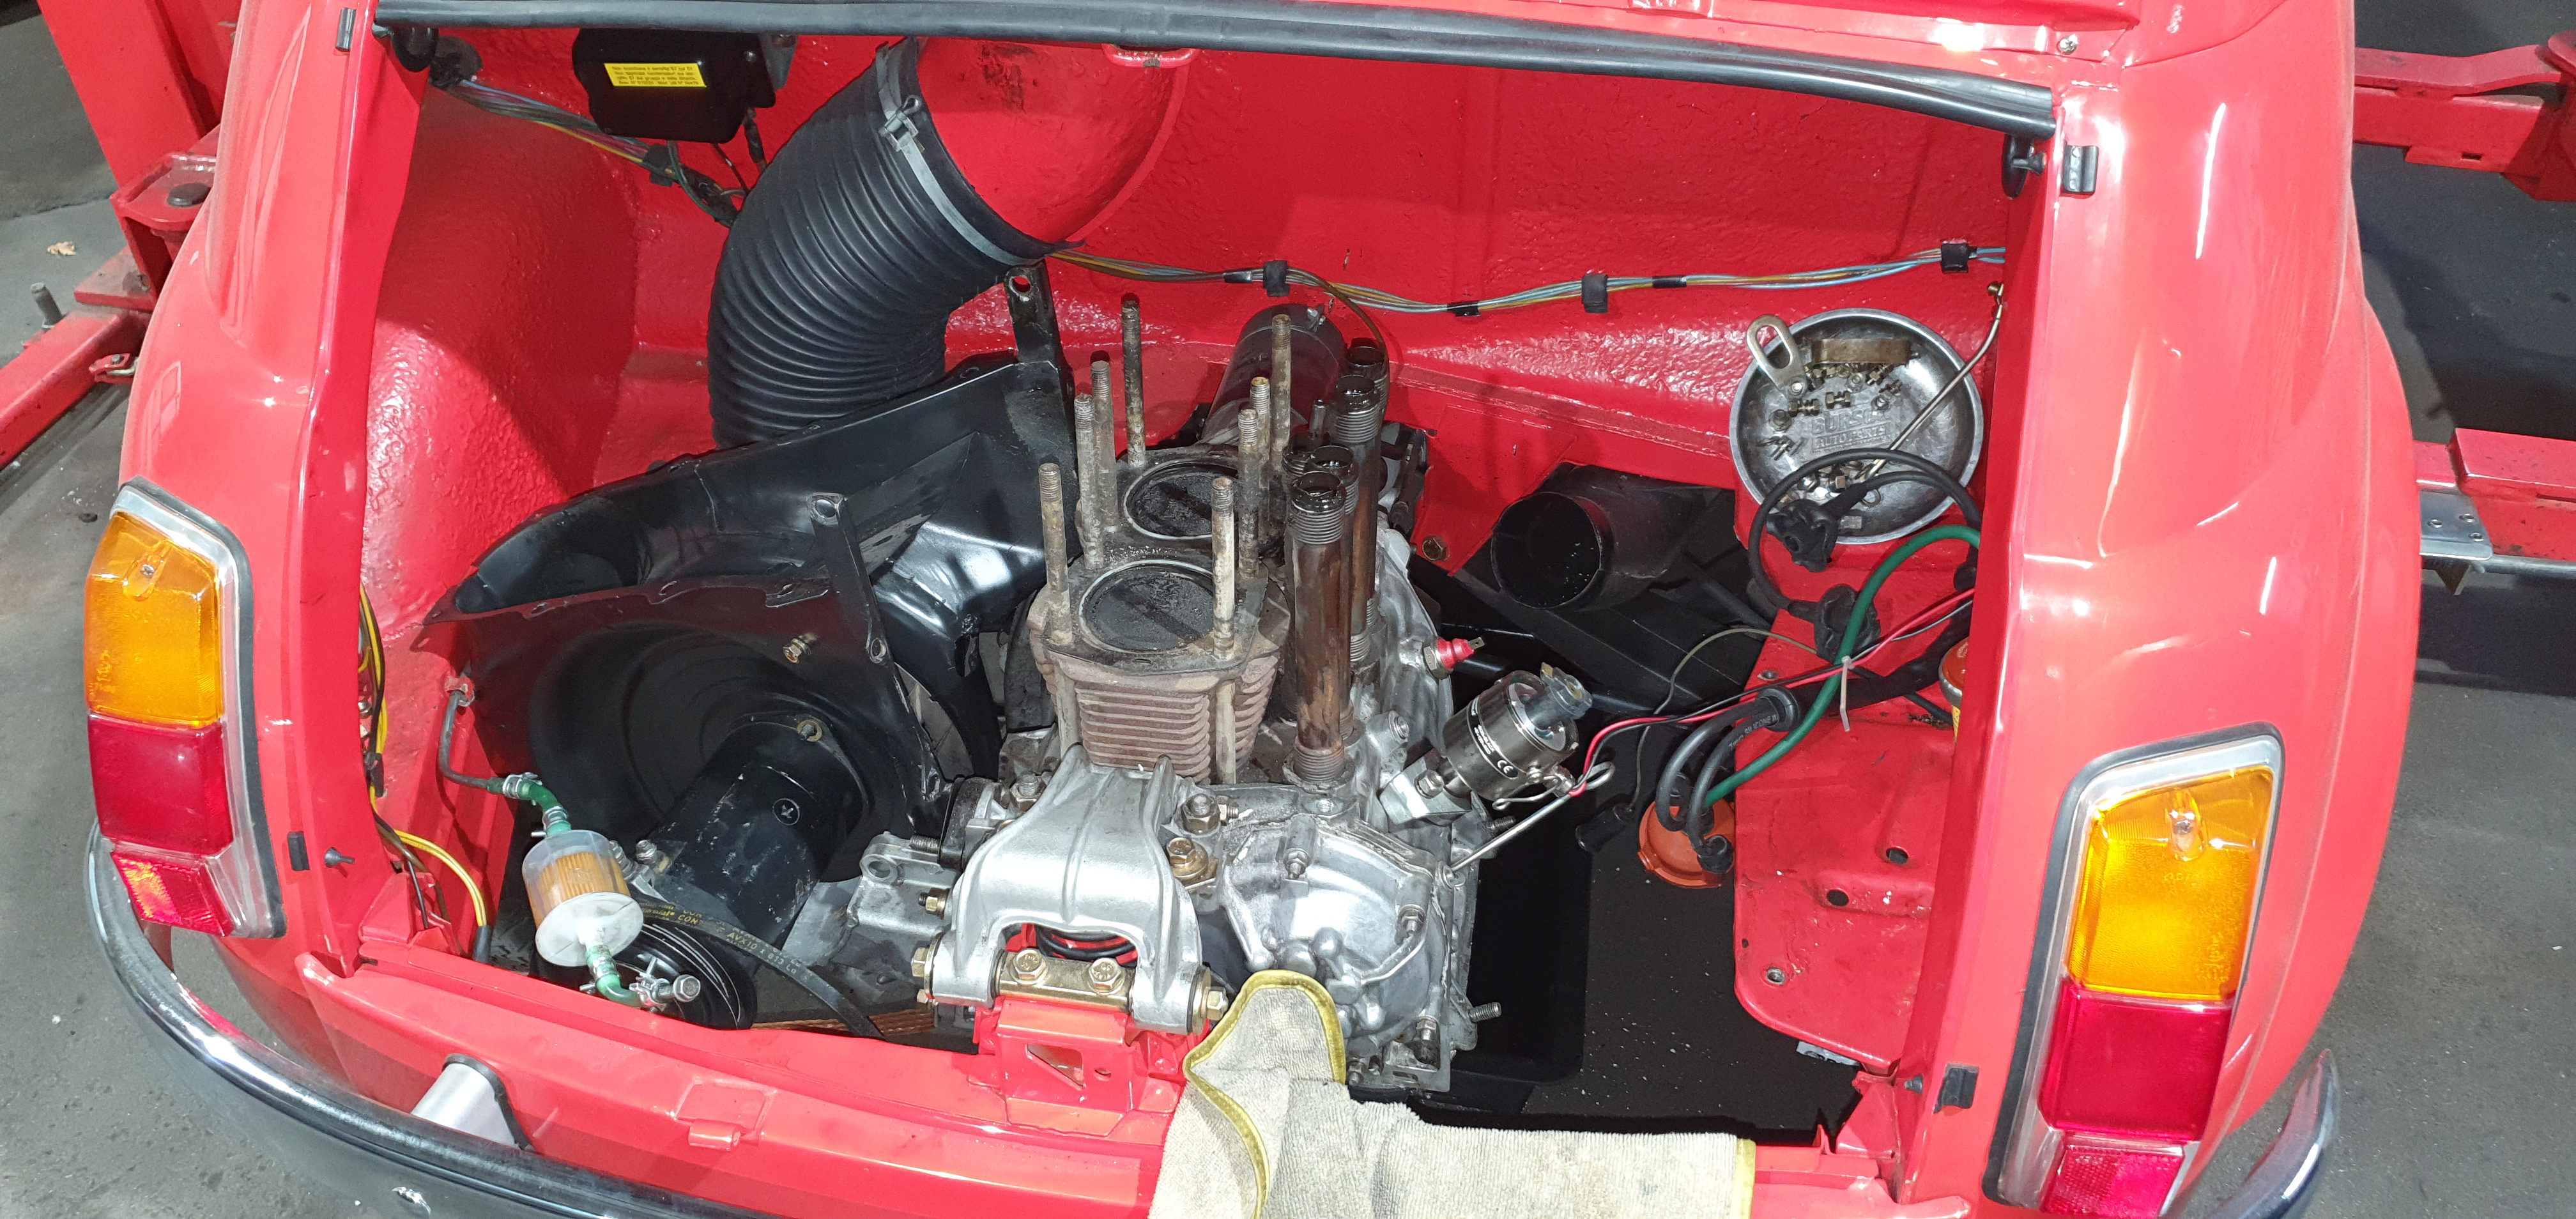
The cylinder head was removed to find the cause of the misfire.
"These little 500cc powered cars were designed for city driving and only produced a tiny 16.2kw(22hp) and 35.3Nm of torque when delivered from the factory. Their top speed peaked at 95km/h. Not the kind of car you'd wanna be in whilst travelling on a highway with a semi-trailer roaring past you."
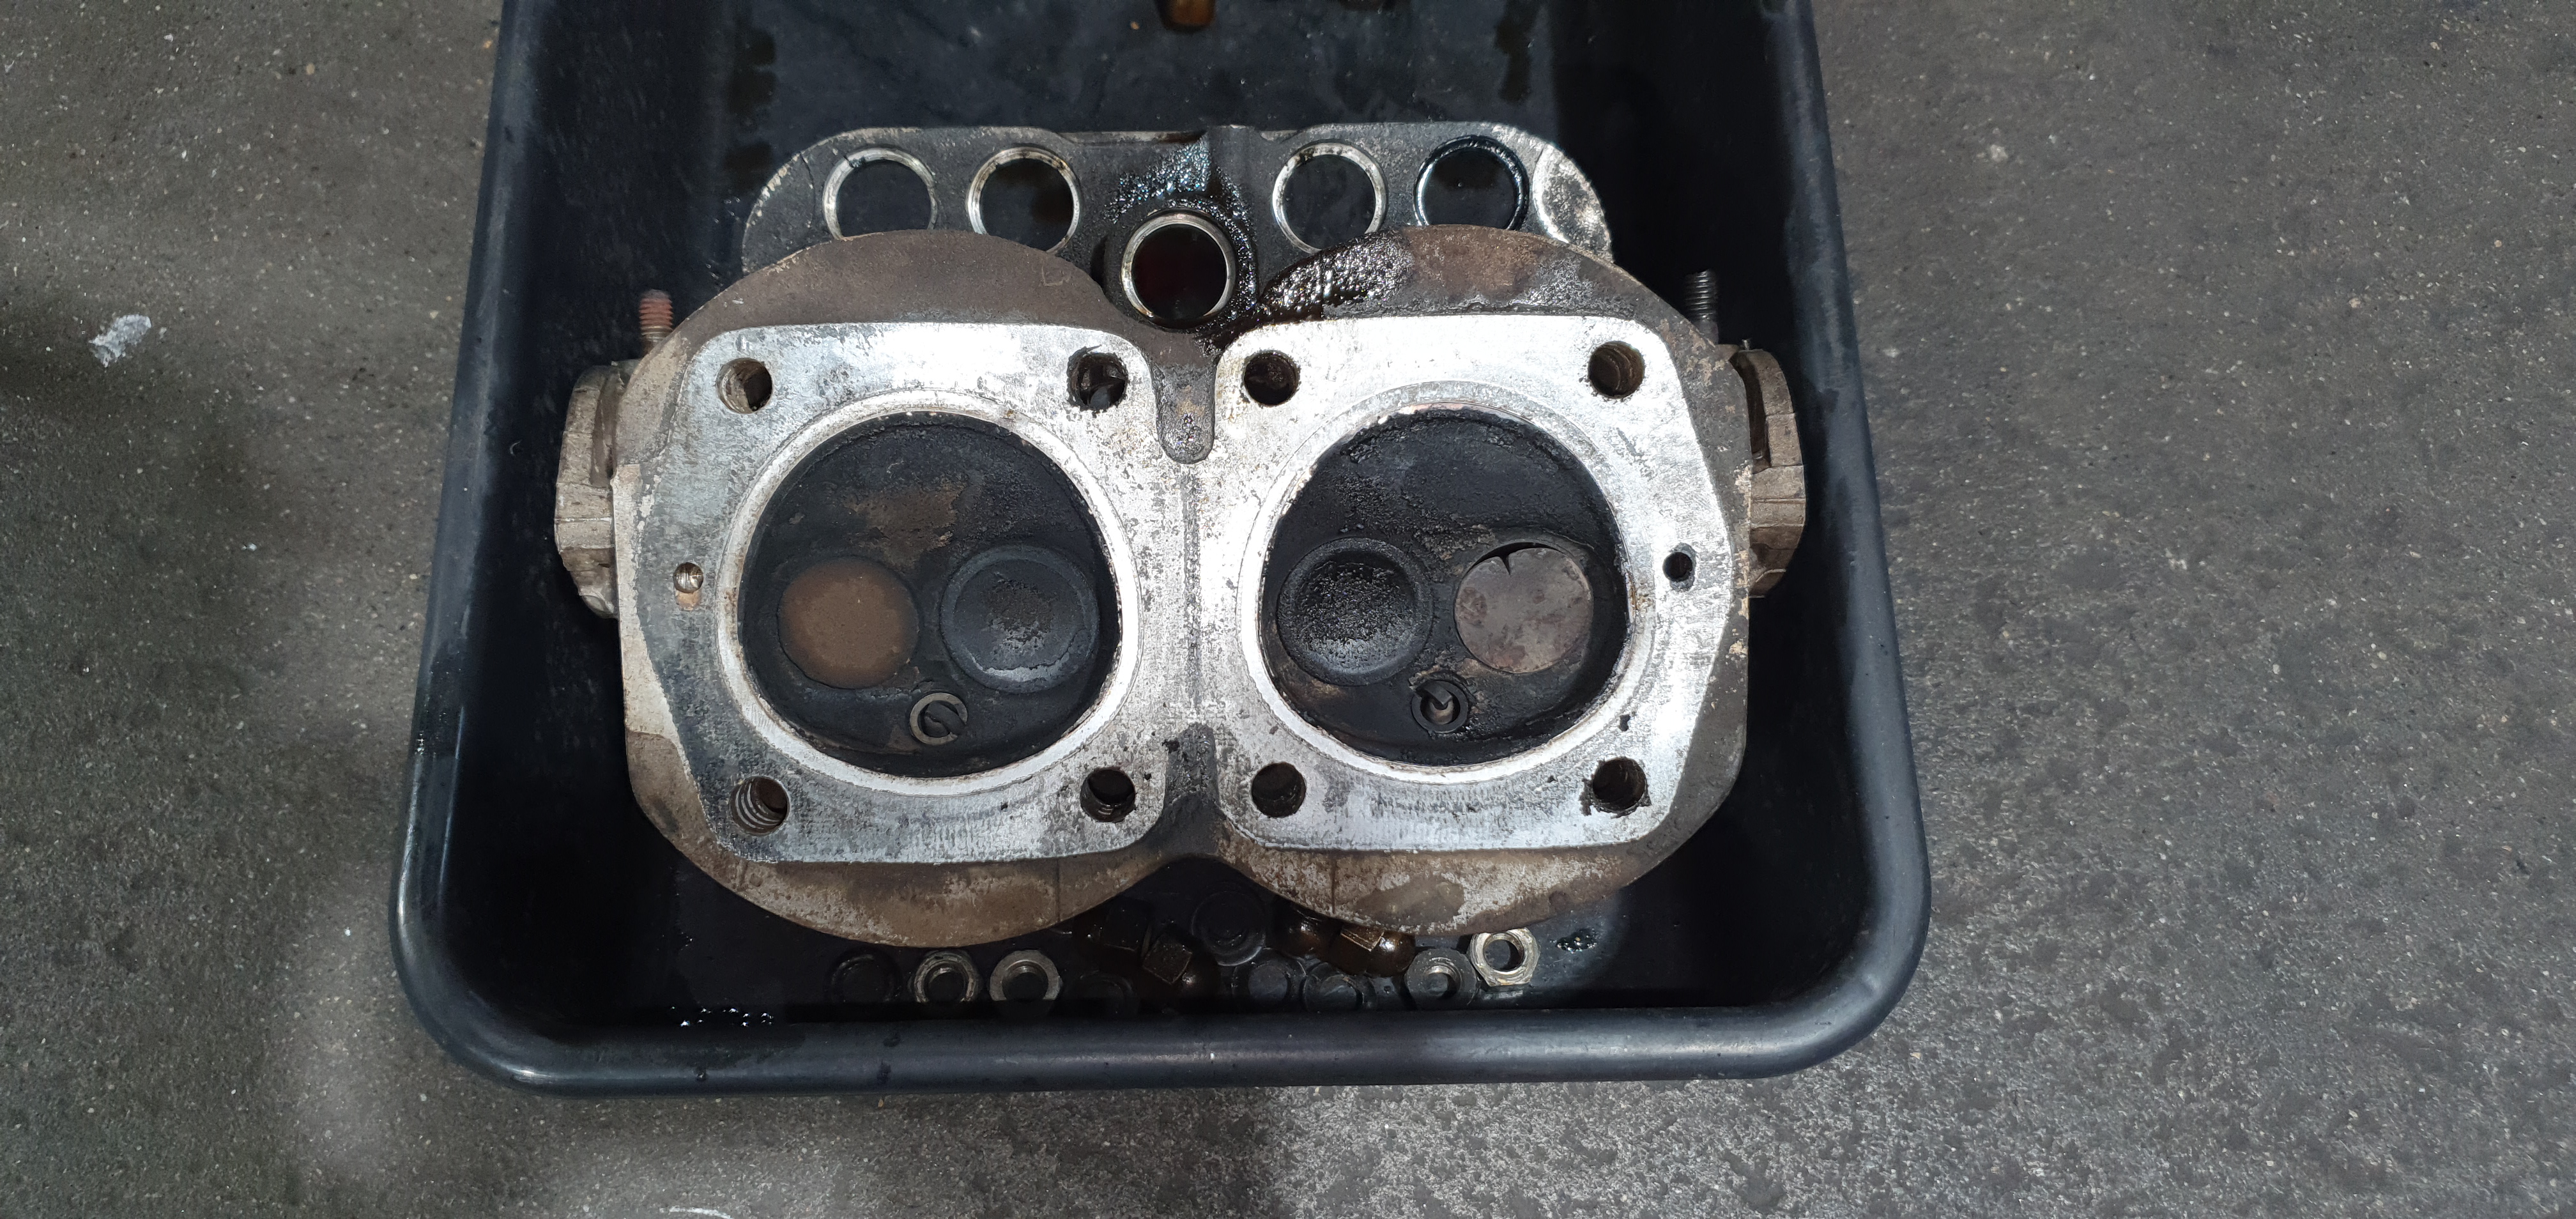
A badly burnt valve was clearly visible with the head removed.
The Research
With the cylinder head removed, it was clear that the cause of the misfire was a badly burnt exhaust valve. The engine was then completely removed and further disassembly showed more excessive wear and internal damage, including broken compression rings on both pistons. There was also evidence of a previous timing chain failure thanks to the score marks that were evident on the inside of the timing cover. How did this car make it to our workshop running on only one cylinder and with broken piston rings? We will never know but we suddenly had a lot more respect for this tired little engine.
The engine was removed to receive a complete overhaul.

The thick sludge of oil found in the sump and blocking the pickup.

Further dismantling of the engine found more badly worn parts and broken piston rings.

The wear on the face of the oil pump meant it definitely required replacing.

More wear found in the camshaft journal bearing within the crankcase.
The Plan
Seeing as though Rob had already upgraded to a newer, better gearbox and clutch combo, and the new electronic ignition system was good for anything up to a 700cc engine combo, we decided that upgrading to a 652cc combo would be enough of a power increase while still keeping it reliable enough to drive on a summers day without having to stop every few meters to check the oil or let the engine cool down. Another bonus was that the parts that would be required are the same ones found in the later Fiat 126 that came standard with a 652cc, and an engine that enables you to swap cylinder bores and pistons by simply lifting them out and sitting new ones in meant fitting a larger size was as simple as slightly honing the crankcase enough to enable the larger bore sleeve to slide in.... Well at least we had read of it being done on the forums. Finally, we had a plan, an estimated power increase figure and a total to put forward to owner, Rob. He giggled at the thought of the upped power figure, a total of 19kw and 41Nm of torque. (In a car weighing less than 500kg, this is a good increase). Then with excitement, he gave us the go ahead.The Parts
It was now time to compile a list of all the parts we required, including anything that was worn or close to worn. Rebuilding a 500cc 2-cylinder Fiat engine whilst increasing its size requires patience as we found out. Everything had to be new or near new, and dimensions and angles of one part had to match those of another part in order for it to run correctly and efficiently whilst being reliable and looking as close to factory as possible. The next month consisted of more late nights contacting various parts suppliers. Some required the aid of Google translate which got too complicated, others took days to reply if they replied at all. Most did not ship to Australia. Either way, we managed to compile a list of components we would require and before ordering, we contacted our engine machinist, Graham from Hi-Torque Engines, and handed him the list to see if he would require any other bits as he would be doing the machine work. With the list finalised, Rob gave us the details of the supplier he had previously purchased his parts from. We decided that if Rob was happy with this particular supplier, then we knew we could at least rely on them shipping the parts without stealing our money. From the initial contact right through to the final payment and shipping requirements, David from MrFiat.com in America was extremely helpful and even went out of his way to quickly source the pistons he had run out of from another supplier in order to get the parts shipped to us as quick as possible. With the parts now on their way, the excitement began to grow and by now, almost 3 months since it first drove in, our regular customers knew the deal with the Fiat and would ask for updates when they came to visit.The Headache
The parts arrived within one week and it was like Christmas had come early the day the box showed up. We giggled at the small size of the box as the delivery driver sat it on the floor without breaking a sweat. Don't forget, this box contained almost a complete engine and entire sports exhaust system.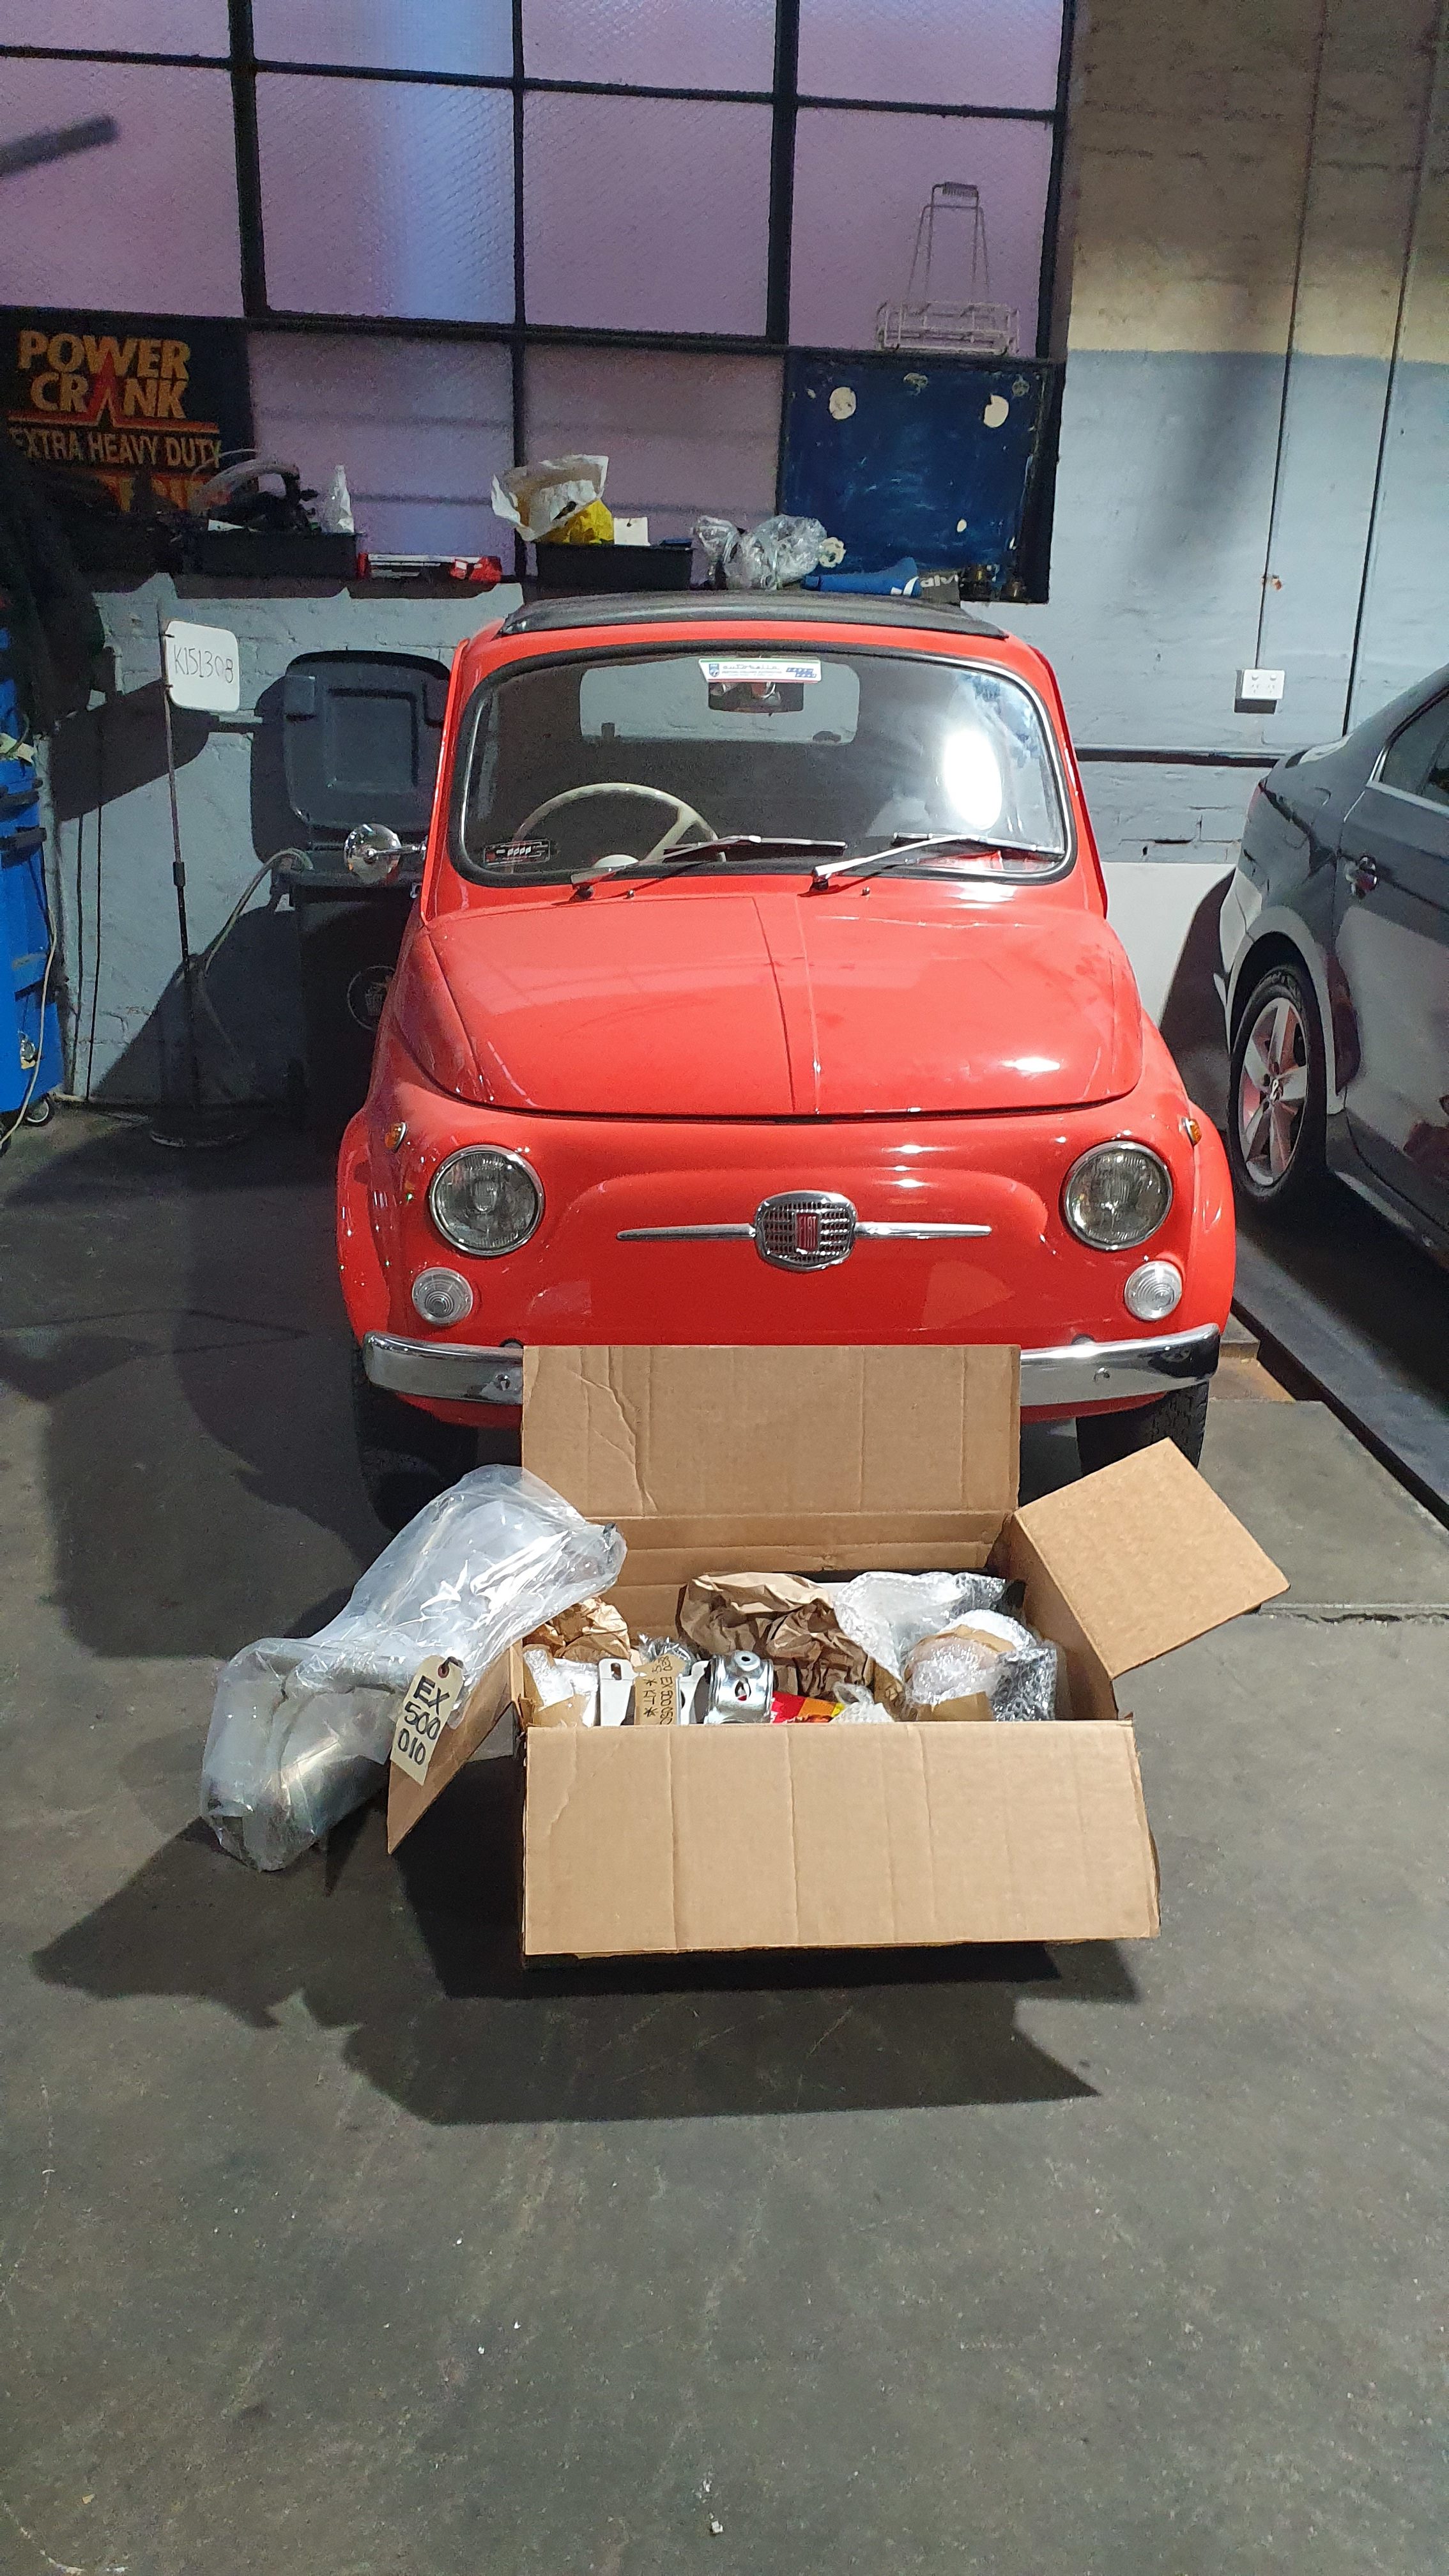
The day the box of parts arrived

The size difference between the original and new Pistons.
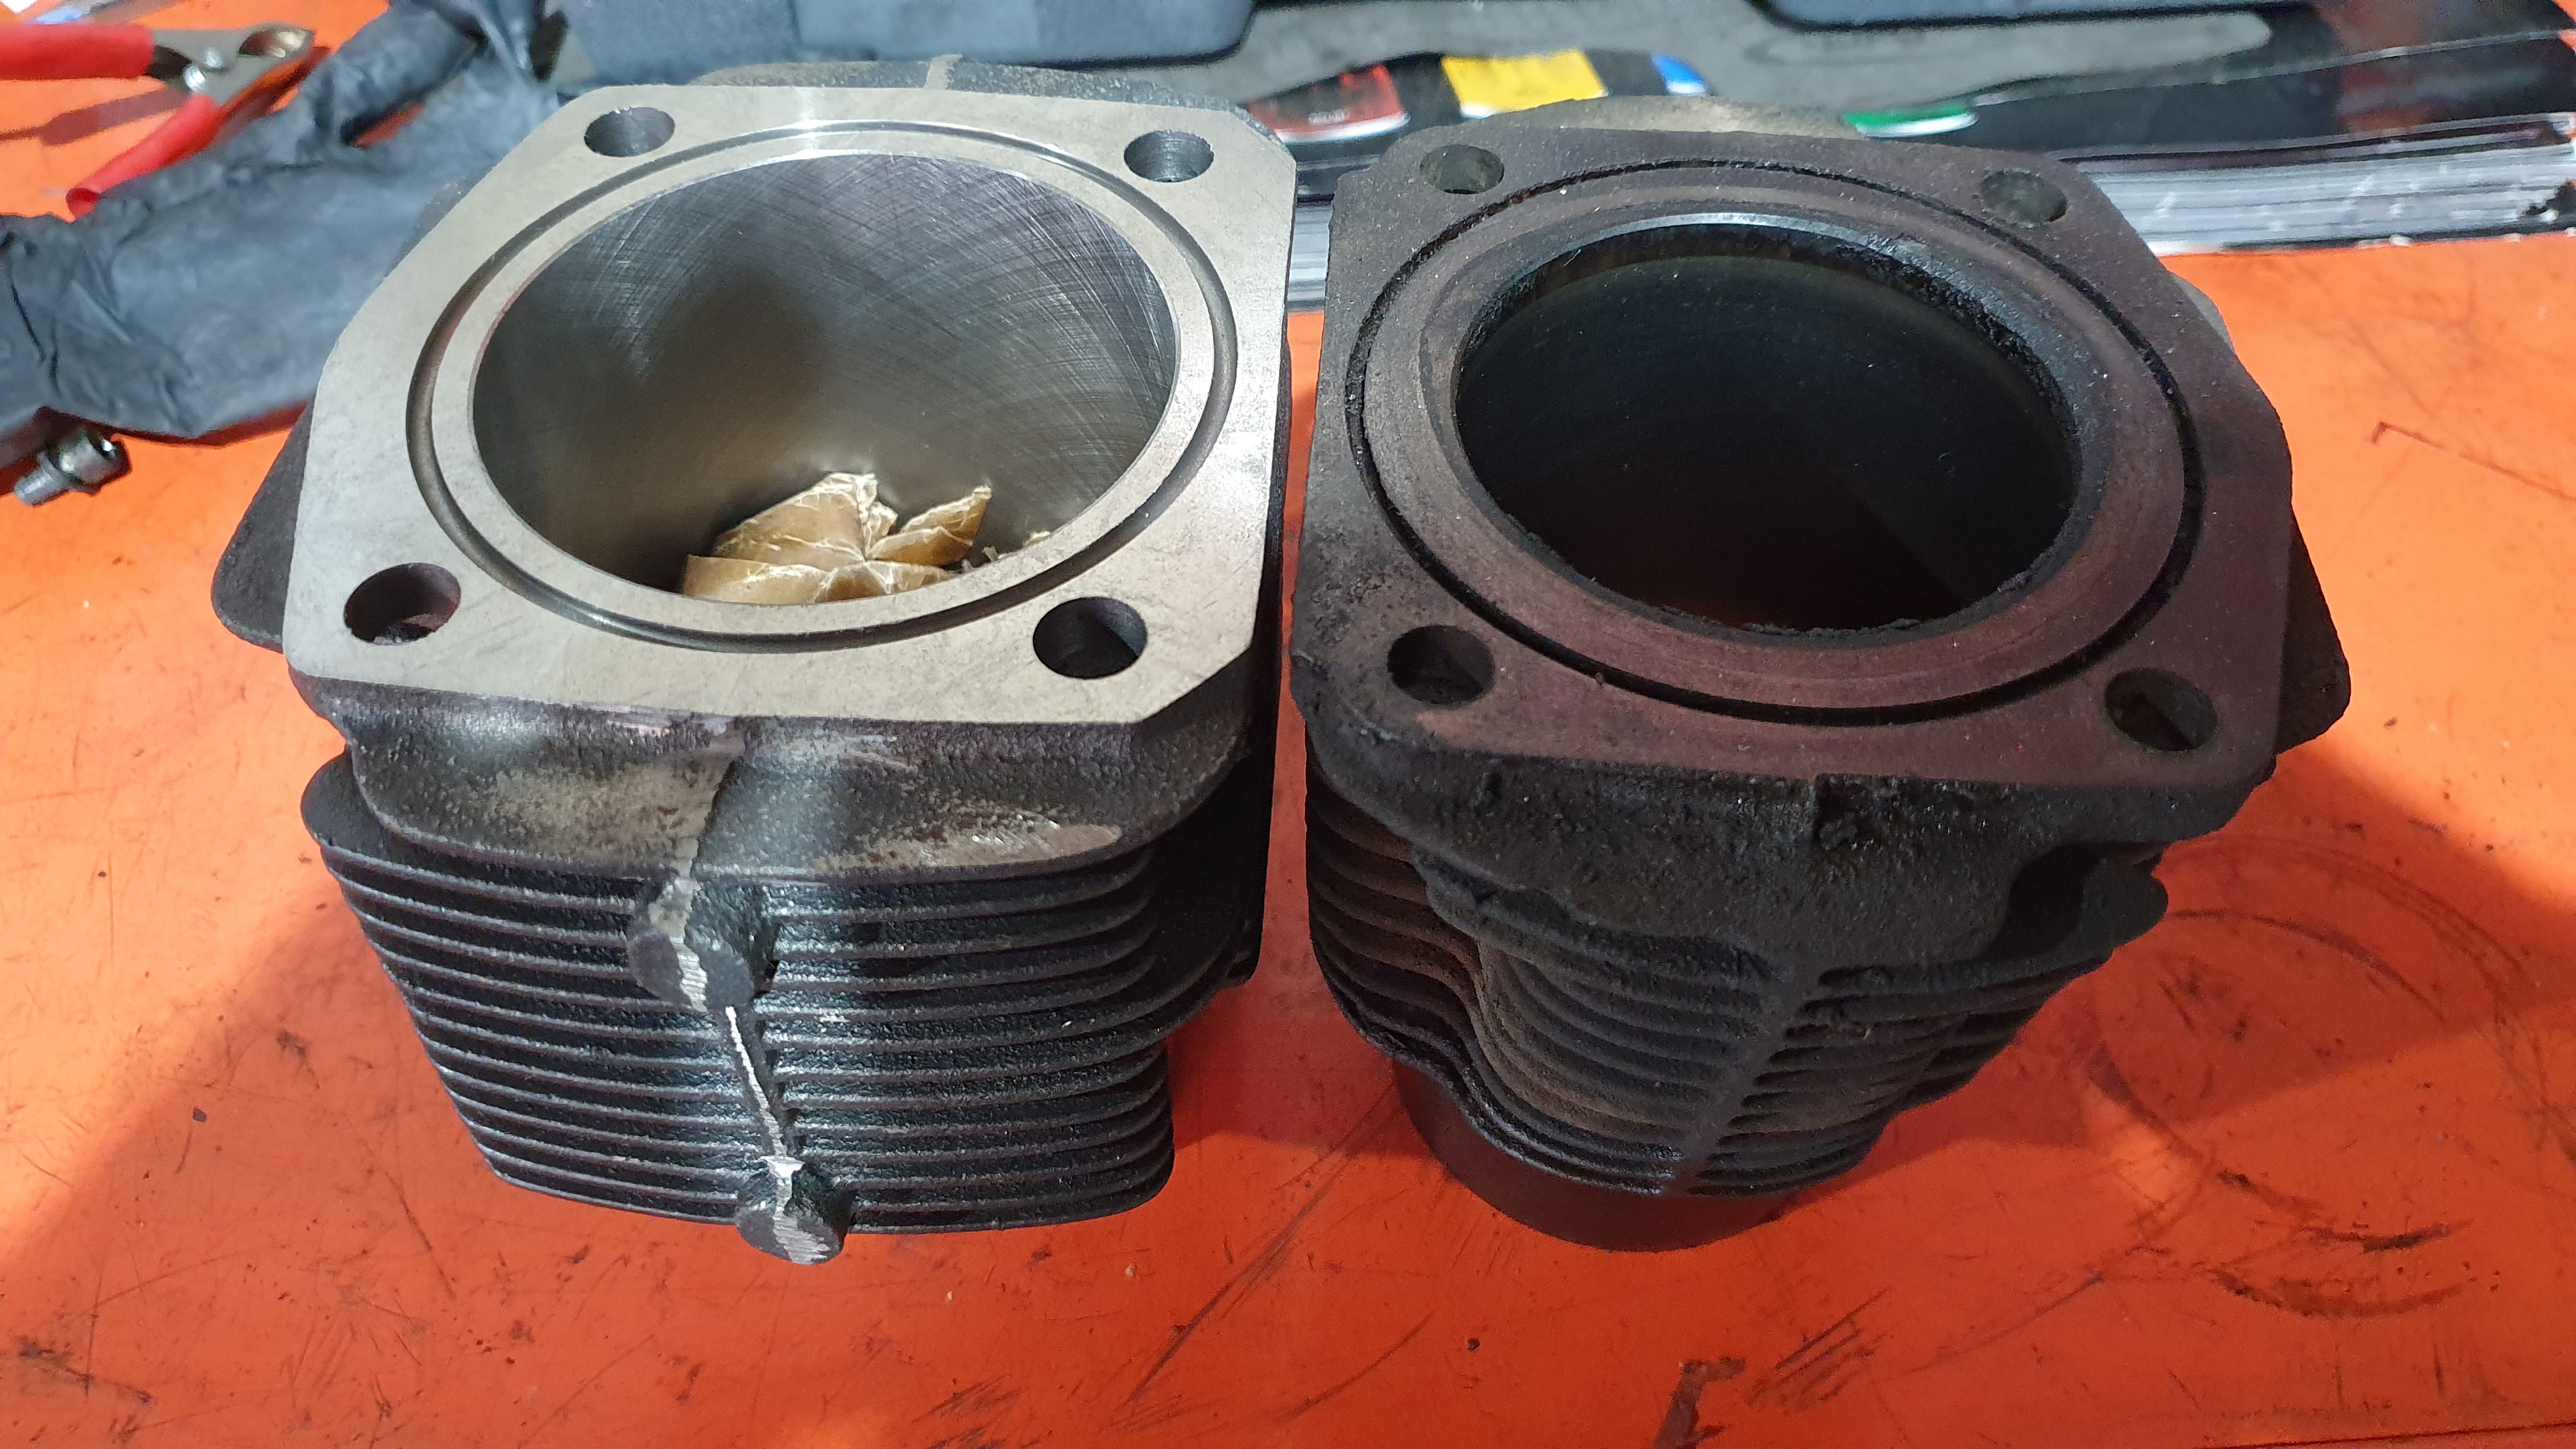
Overall, the height of the new and old cylinder bores were exactly the same. Though the mating surface at the bottom of the new bore sat 9.5mm higher than the original.
The Solution
Another late night searching the net for a solution answered our questions. How did we end up with this issue? And how do we rectify it? During our initial research for parts and reading forums, we missed a vital piece of information. Yes, many people were upgrading 500cc to 650cc, but they were either swapping a complete engine with that of a Fiat 126 or modifying a 126 500cc crankcase. We learnt that the 126 crankcase was stronger and could be bored out without compromising strength. This was due to only one reason, the top of the 126 crankcase was 9.8mm taller. Swapping to a 126 crankcase now was out of the question as the fact that the crankcase was taller meant that the gearbox bell housing was different to the smaller 500 one. This would mean the new synchro gearbox recently installed would be useless. Another few emails were sent to David who had 2 solutions available. He first offered a set of shorter con-rods that would help with the height issue. But this wouldn't stop the counter balance of the crank smashing the lower section of sleeve to pieces as they would still sit too low, it would also reduce the engine size to roughly 623 Cubic Centimetres (CC) due to the shorter stroke. His next option was perfect! A solid steel spacer plate with 650cc sized bore holes, the outer edge perfectly matched to the shape of the crankcase and a thickness of 9.75mm and ready on the shelf to be shipped. The remaining height would be taken up by using copper gaskets to seal the contact areas between the plate & crankcase and also plate & cylinder bores. This would also help strengthen the crankcase dramatically.The Machine Work
Unfortunately the spacer plate was shipped with regular postage. An unfortunate mistake we made during checkout when we finalised the sale online. This meant three more weeks passed before the spacer arrived and pushed the build back a lot more. More than 4 months into the project and Graham was only just about to start measuring and machining, but at least we were moving forward. Once the plate arrived, Graham was still slightly concerned with the integrity of the crankcase as he had to still had to remove 6mm from the diameter of each bore hole. So instead of just machining the holes, he very carefully machined a step into the crankcase that would match the profile of the new bore sleeves. This created a very snug fit and the step would reduce any gaps between the sleeve and crankcase, again helping to strengthen the complete unit. He also filled in a void at the rear of the crankcase with alloy weld to prevent the thinner rear wall from cracking under stress. At this point, an unfortunate family emergency meant Graham had to be off work for 2 weeks and again push the project further back. Upon his return to work, he did an amazing job, finishing off the crankcase, linishing the crankshaft and measuring all the components including the new camshaft for correct valve lift and duration. This would help him to be sure that the larger valves we insisted he install into the cylinder head, wouldn't contact other components or each other. The cylinder head was then heavily ported and carefully finished off by matching the size and shape of the ports with those of the new carby manifold and exhaust tubes. He then shaved as much as possible off the face off the head to help raise compression slightly.
Perfect view of Graham's amazing work. Here you can see the perfectly shaped exhaust port and also the void he filled with alloy weld to stop the rear of the crankcase cracking under load.

The crankcase and spacer plate were carefully stepped down to match the profile of the cylinder bore sleeve.

The cylinder head was shaved as much as possible to help raise compression slightly and larger valves fitted to allow better air flow.
The Build
With the parts cleaned and neatly laid out on the bench, we slowly pieced together the rotating pieces of the engine. Enough to enable us to visually inspect the clearances and be sure no contact will occur during engine operation. With everything together, timed correctly and valves adjusted to spec, we turned the engine crankshaft and watched everything move in harmony with one another. It was perfect. But now we had to strip it all down and do it all again, only this time with all the pieces, all new gaskets and all seals.
The engine was "dummy" built to ensure all clearances were exact before being pulled back down and built again with new gaskets and seals.
- New crank support bearings
- New big end bearings
- New 40/80 street/race camshaft
- New head stud and nut set
- New rocker shaft and cover stud kit
- New engine gasket kit
- Copper head gasket
- New forged lifters
- New polished aluminum pushrod sleeves
- New oil pump
- New fuel pump pushrod
- New carburettor manifold (bakerlite)
- And a brand new, genuine "Weber" 26IMB carby

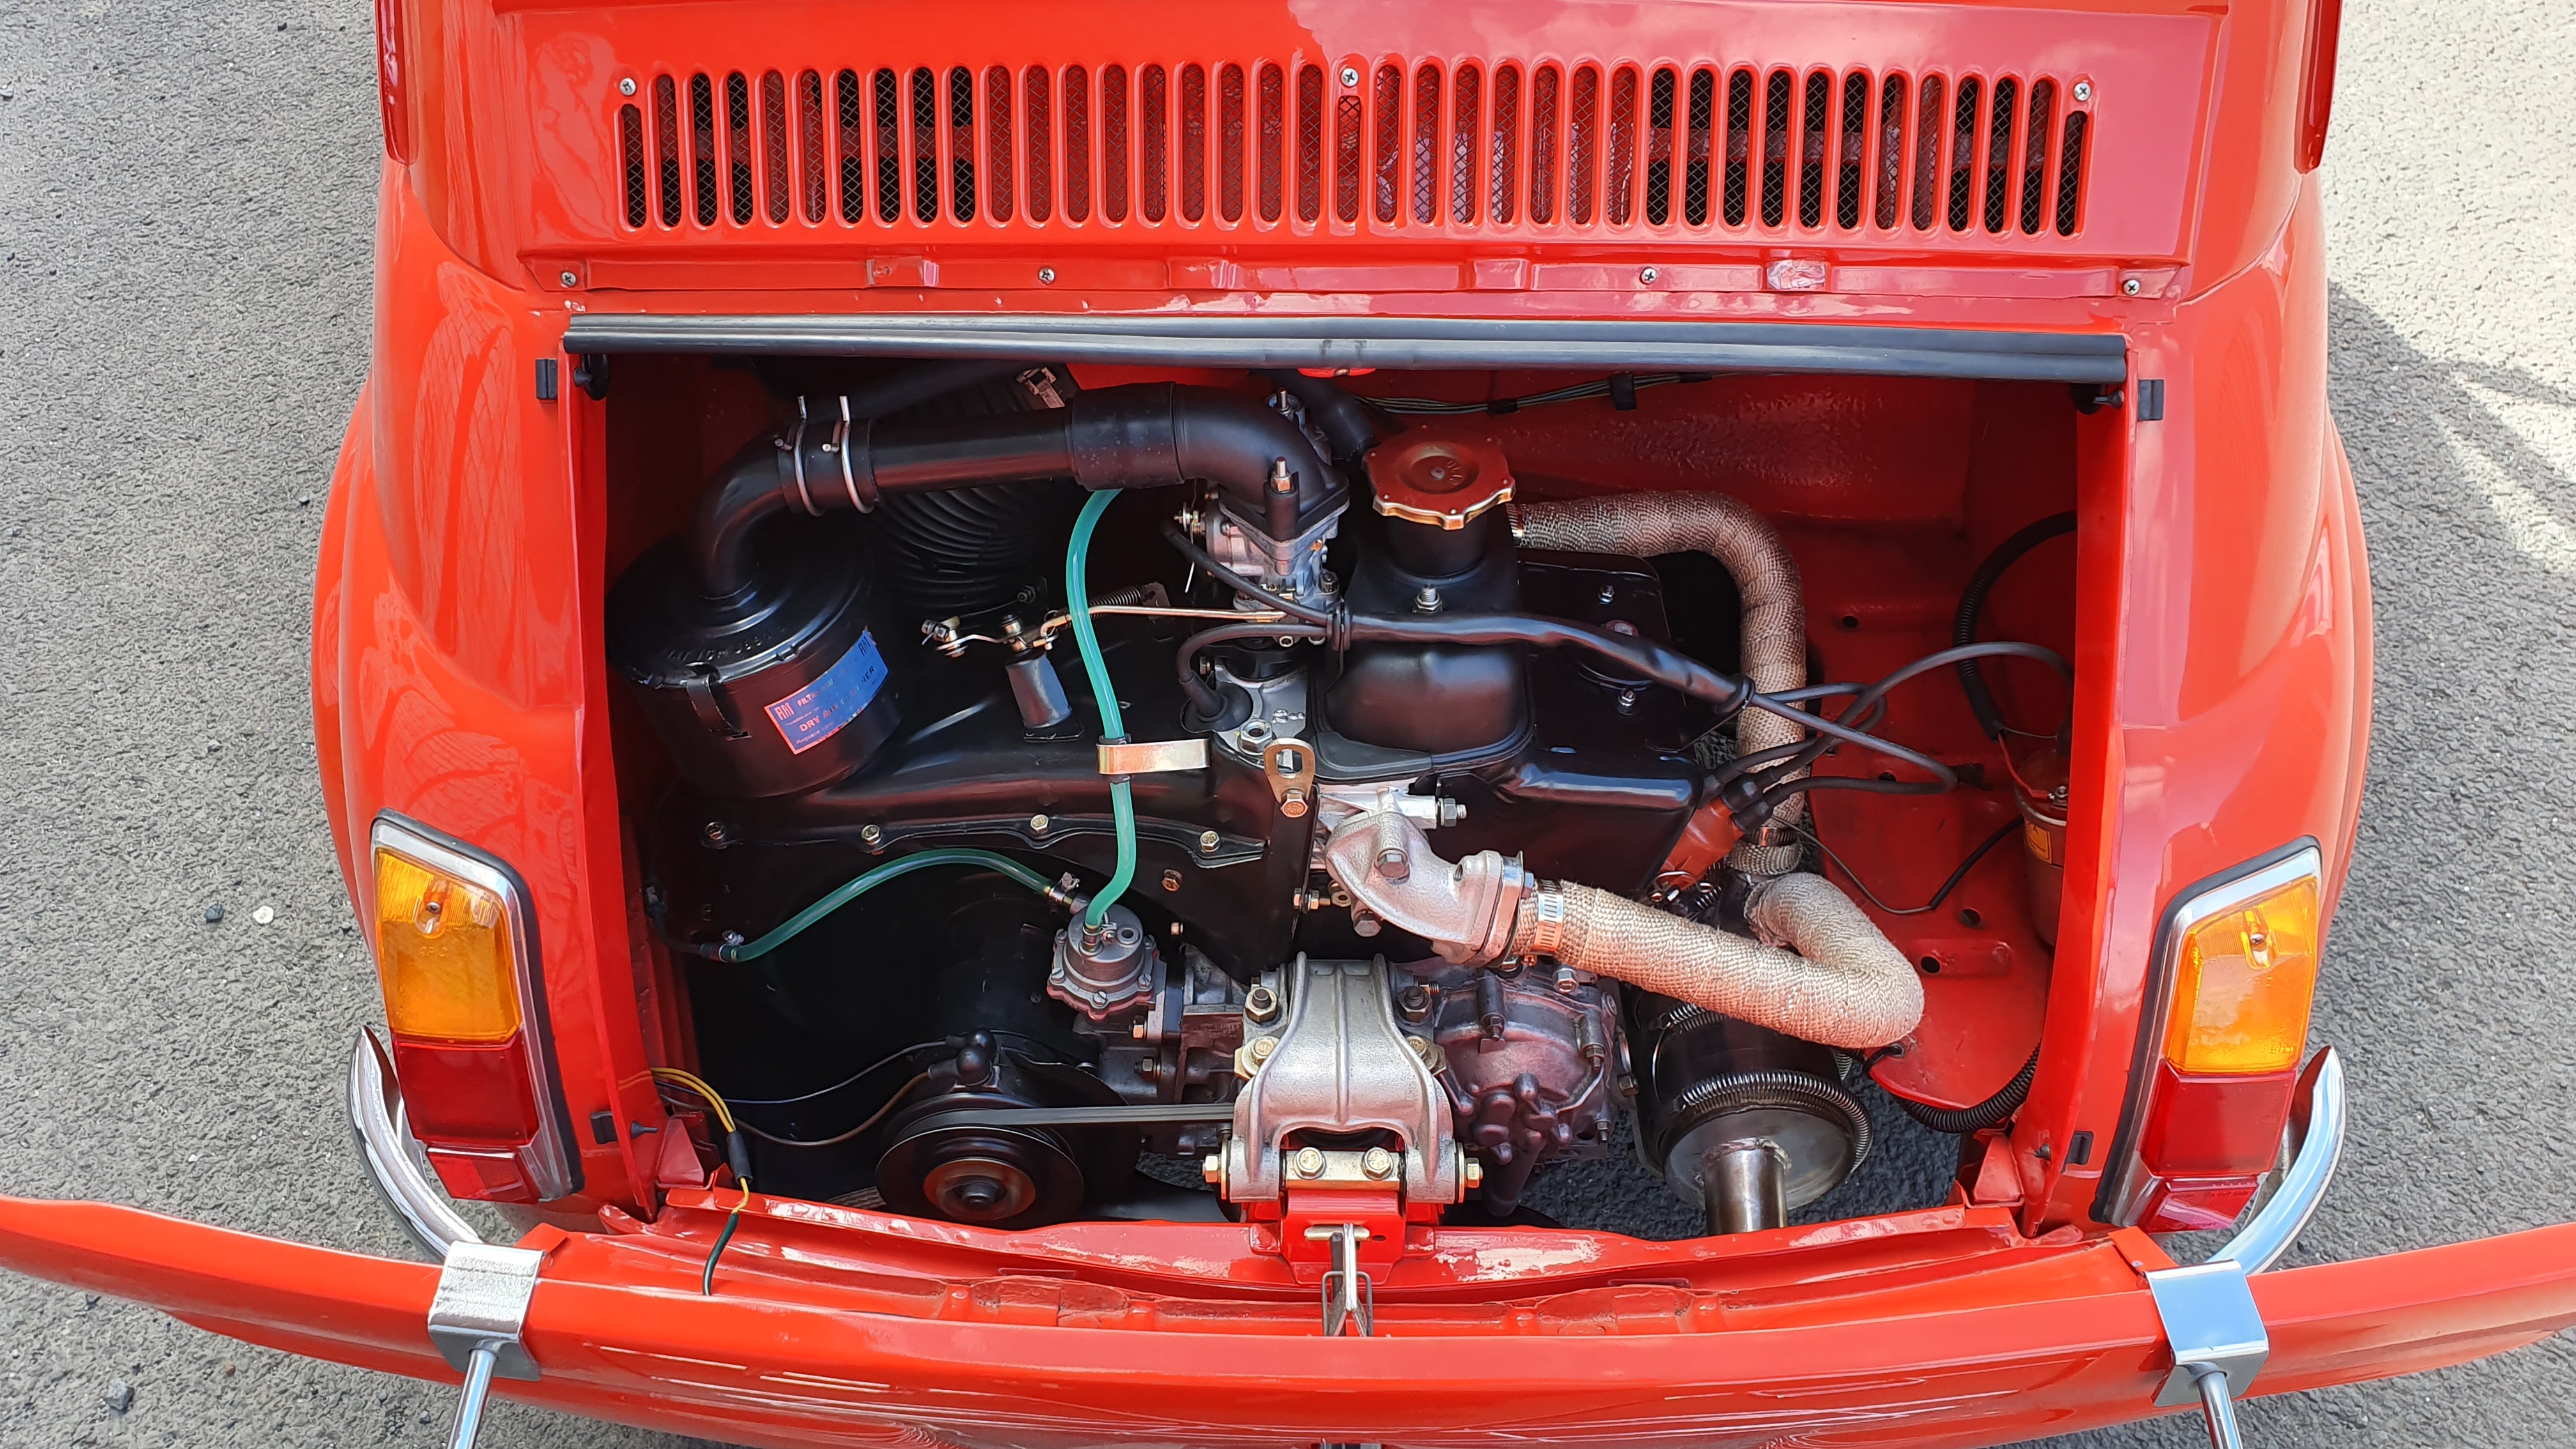
The crank and cam installed using a quality assembly lube

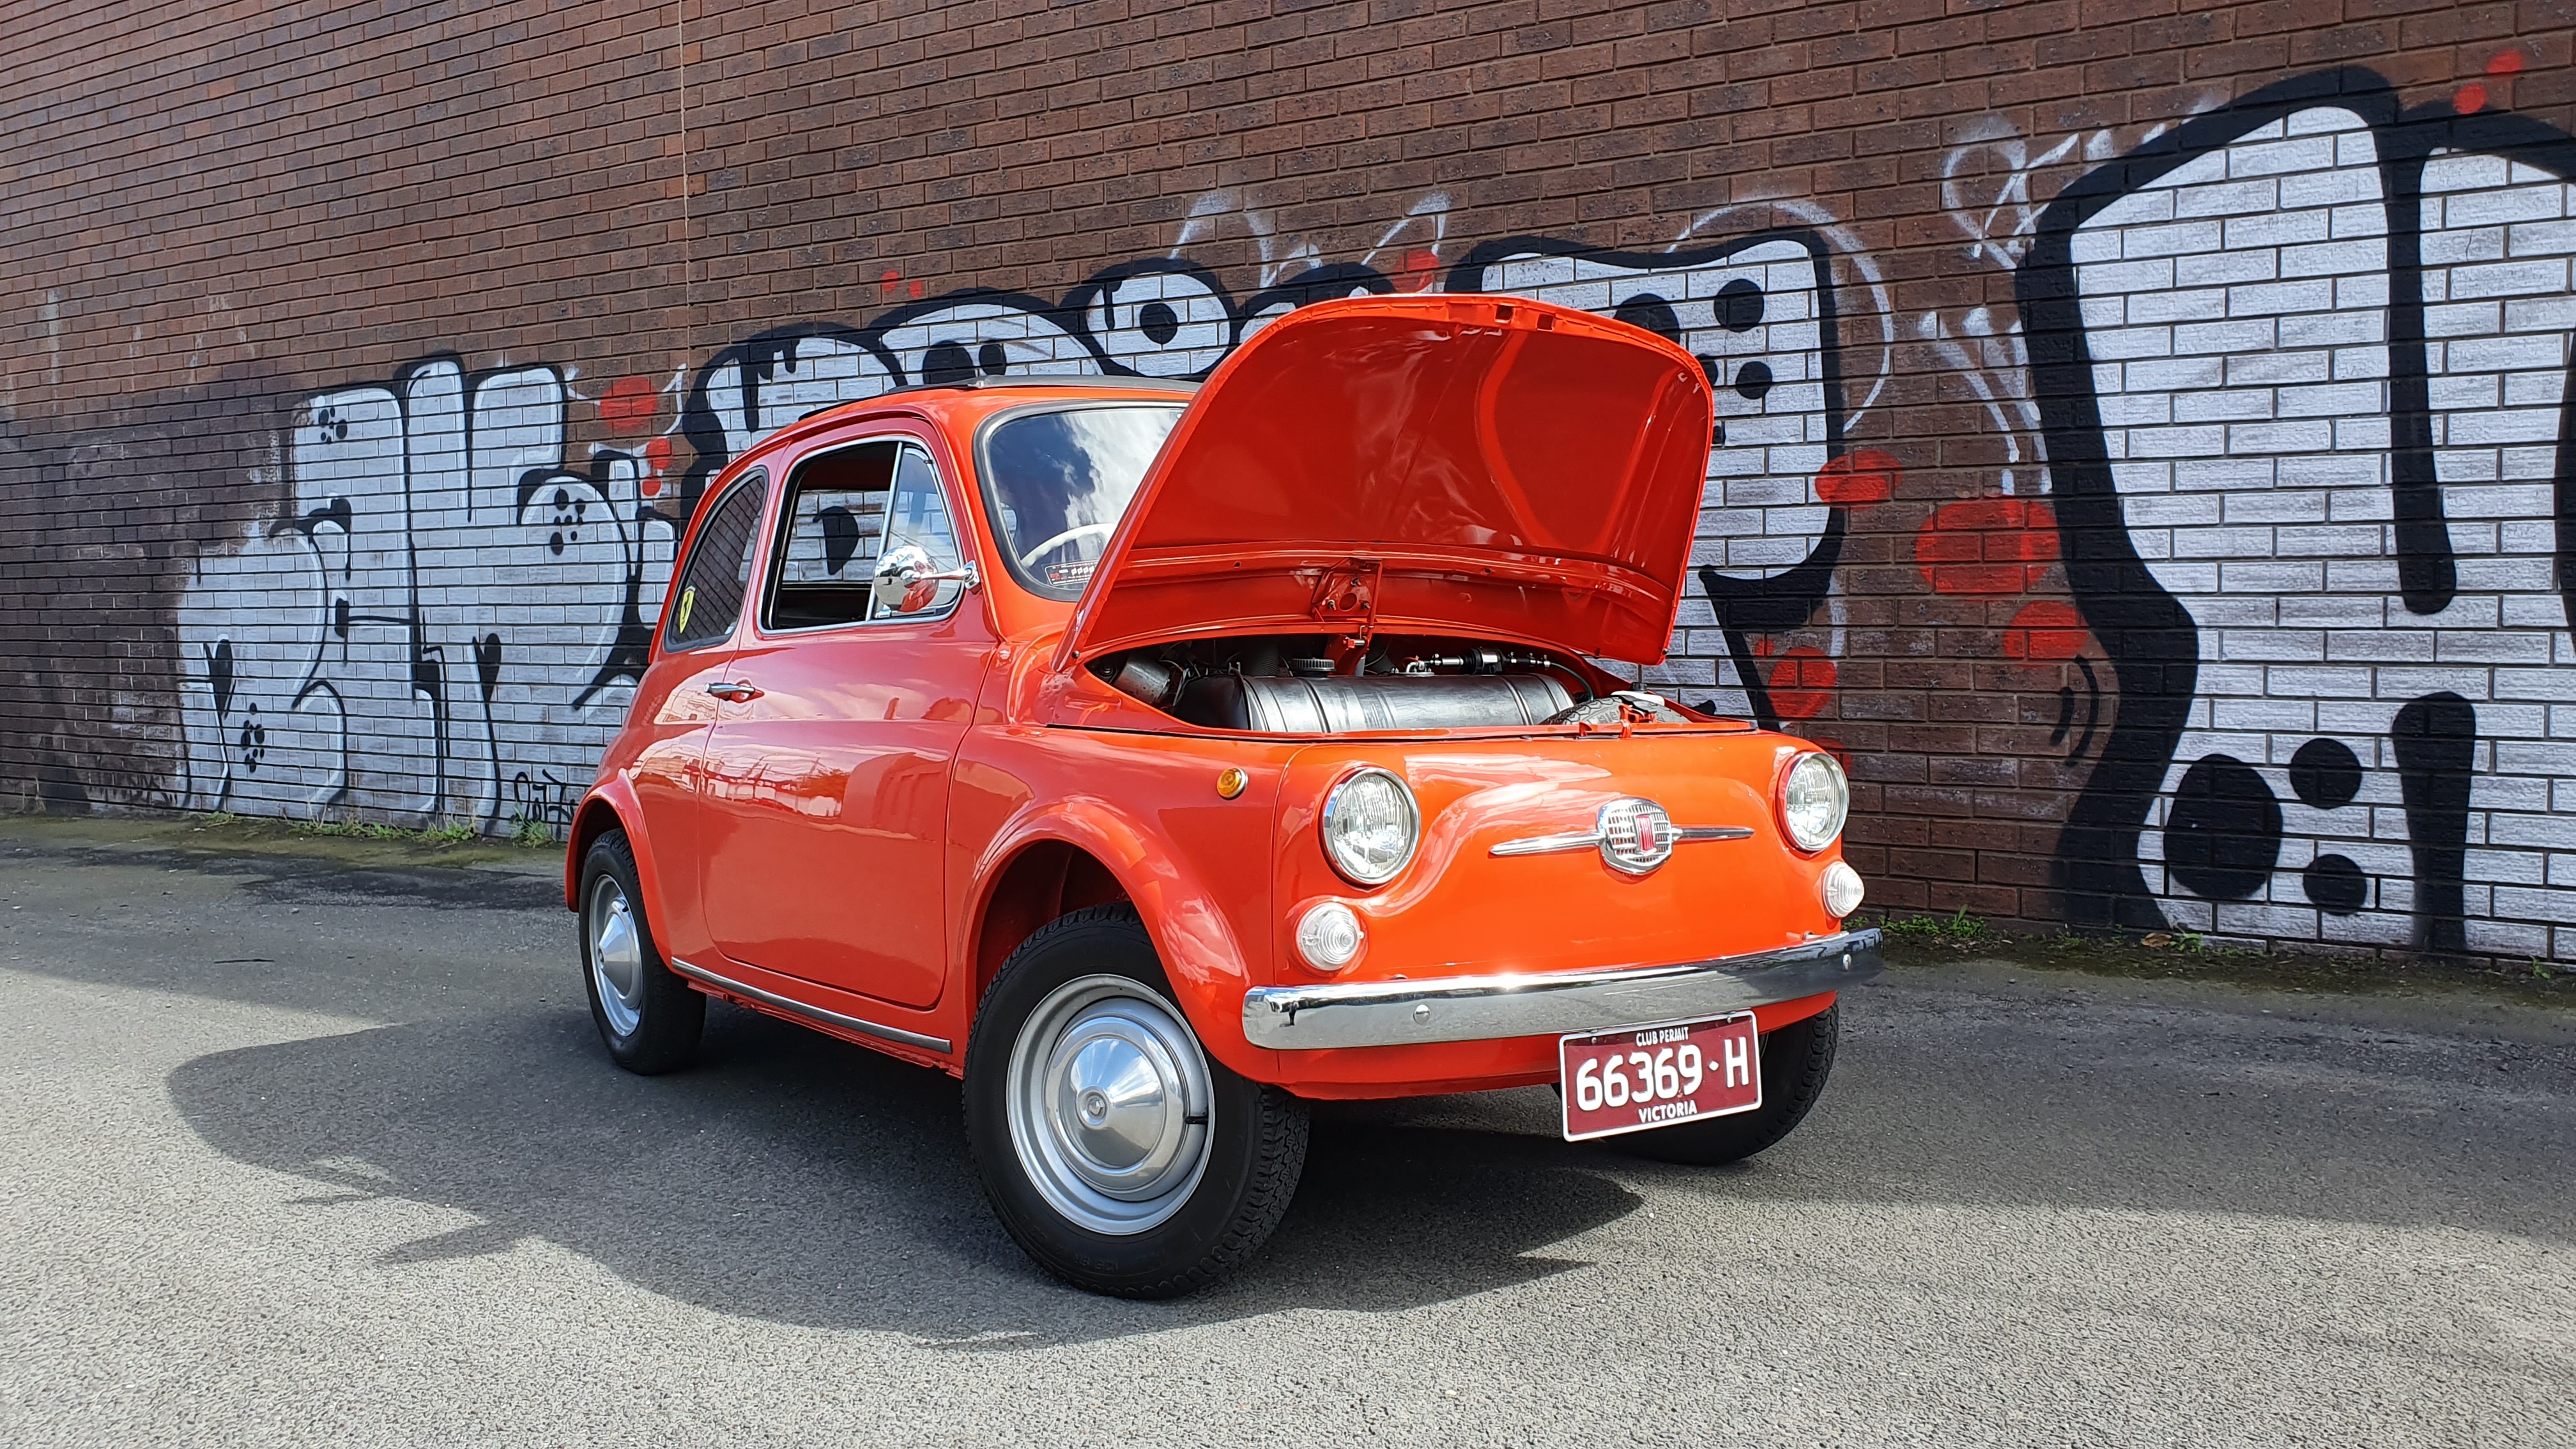
The finished 650cc engine ready to be installed.

Finished 650cc engine
The install and initial start
By now, it was almost September. Nearly 6 months since we first began this project and after finishing off all the other jobs that had gotten in the way of this one, it was time to finally get the Fiat finished. Installing the engine was relatively easy. Being so small you could almost lift it into place with just your hands. After sitting it in and reinstalling the rear bar, which also acts as the engine support, we phoned Rob to let him know that his pride and joy will be ready to turn the key for the first time by that afternoon. The engine was filled with a thick run-in oil and just as we were finishing off the final bit of wiring, Rob walked in the door. We gave him the honour of cranking the engine for the first time. After adjusting the carby and timing slightly, the little 650cc roared to life and with a few more minor adjustments, was running perfectly and with a nice exhaust note that put a smile on Rob's face once more. With everyone satisfied with how well the car was running, we let it run-In for an hour on idle while keeping an eye on everything.The Final Touches
With the engine idling away, we noticed the oil pressure warning light coming up on the dash. We decided to shut it down and not risk any engine damage. We also found that the new exhaust created an amazing amount of heat in the engine bay which was a great concern seeing as though it was only air-cooled. With the Fiat so close to being on the road again, we were eager to see it finished and back with its owner. We suspected the low oil pressure to be caused by the now worn off special coating used on the new camshaft and lifters. We were expecting it to occur, just not this soon. We drained the oil and removed the sump and surely enough, the cam and other parts had worn in. The parts were actually wearing in perfectly which was great news. We cleaned the centrifugal oil filter out, added fresh oil and let her run again. After 20 minutes, to our disbelief, the oil pressure,warning light was glowing again. We shut her down again and this time swapped the oil pressure sender for an oil pressure gauge. Surely the sensor had to be either faulty or the heat generated by the new exhaust was causing it to play games. With the gauge fitted up, the car was running once more. Though this time, while keeping an eye on the gauge, the engine suddenly died and refused to start again. We still had no idea if the oil pressure was dropping as it hadn't ran long enough and now we had another issue. This was starting to dampen the excitement of the Fiat engine rebuild. But we had to sort it out, and fast. We eventually found that the mechanical fuel pump was not strong enough to pull fuel from the tank at the front as well as push enough fuel through the carby and back around through the return line with enough volume. This was causing air-locks in the system. There was only one way to solve this and keep the bay looking as original as possible. We looked for and easily found the smallest electric fuel pump we could find. It was a "Derale Performance" 2.5psi in line, low pressure item and also had a small in line filter to suit. We custom made a bracket and fitted it up front as neatly as the tiny space would allow and neatly wired it up. It wasn't factory but still didn't look too out of place.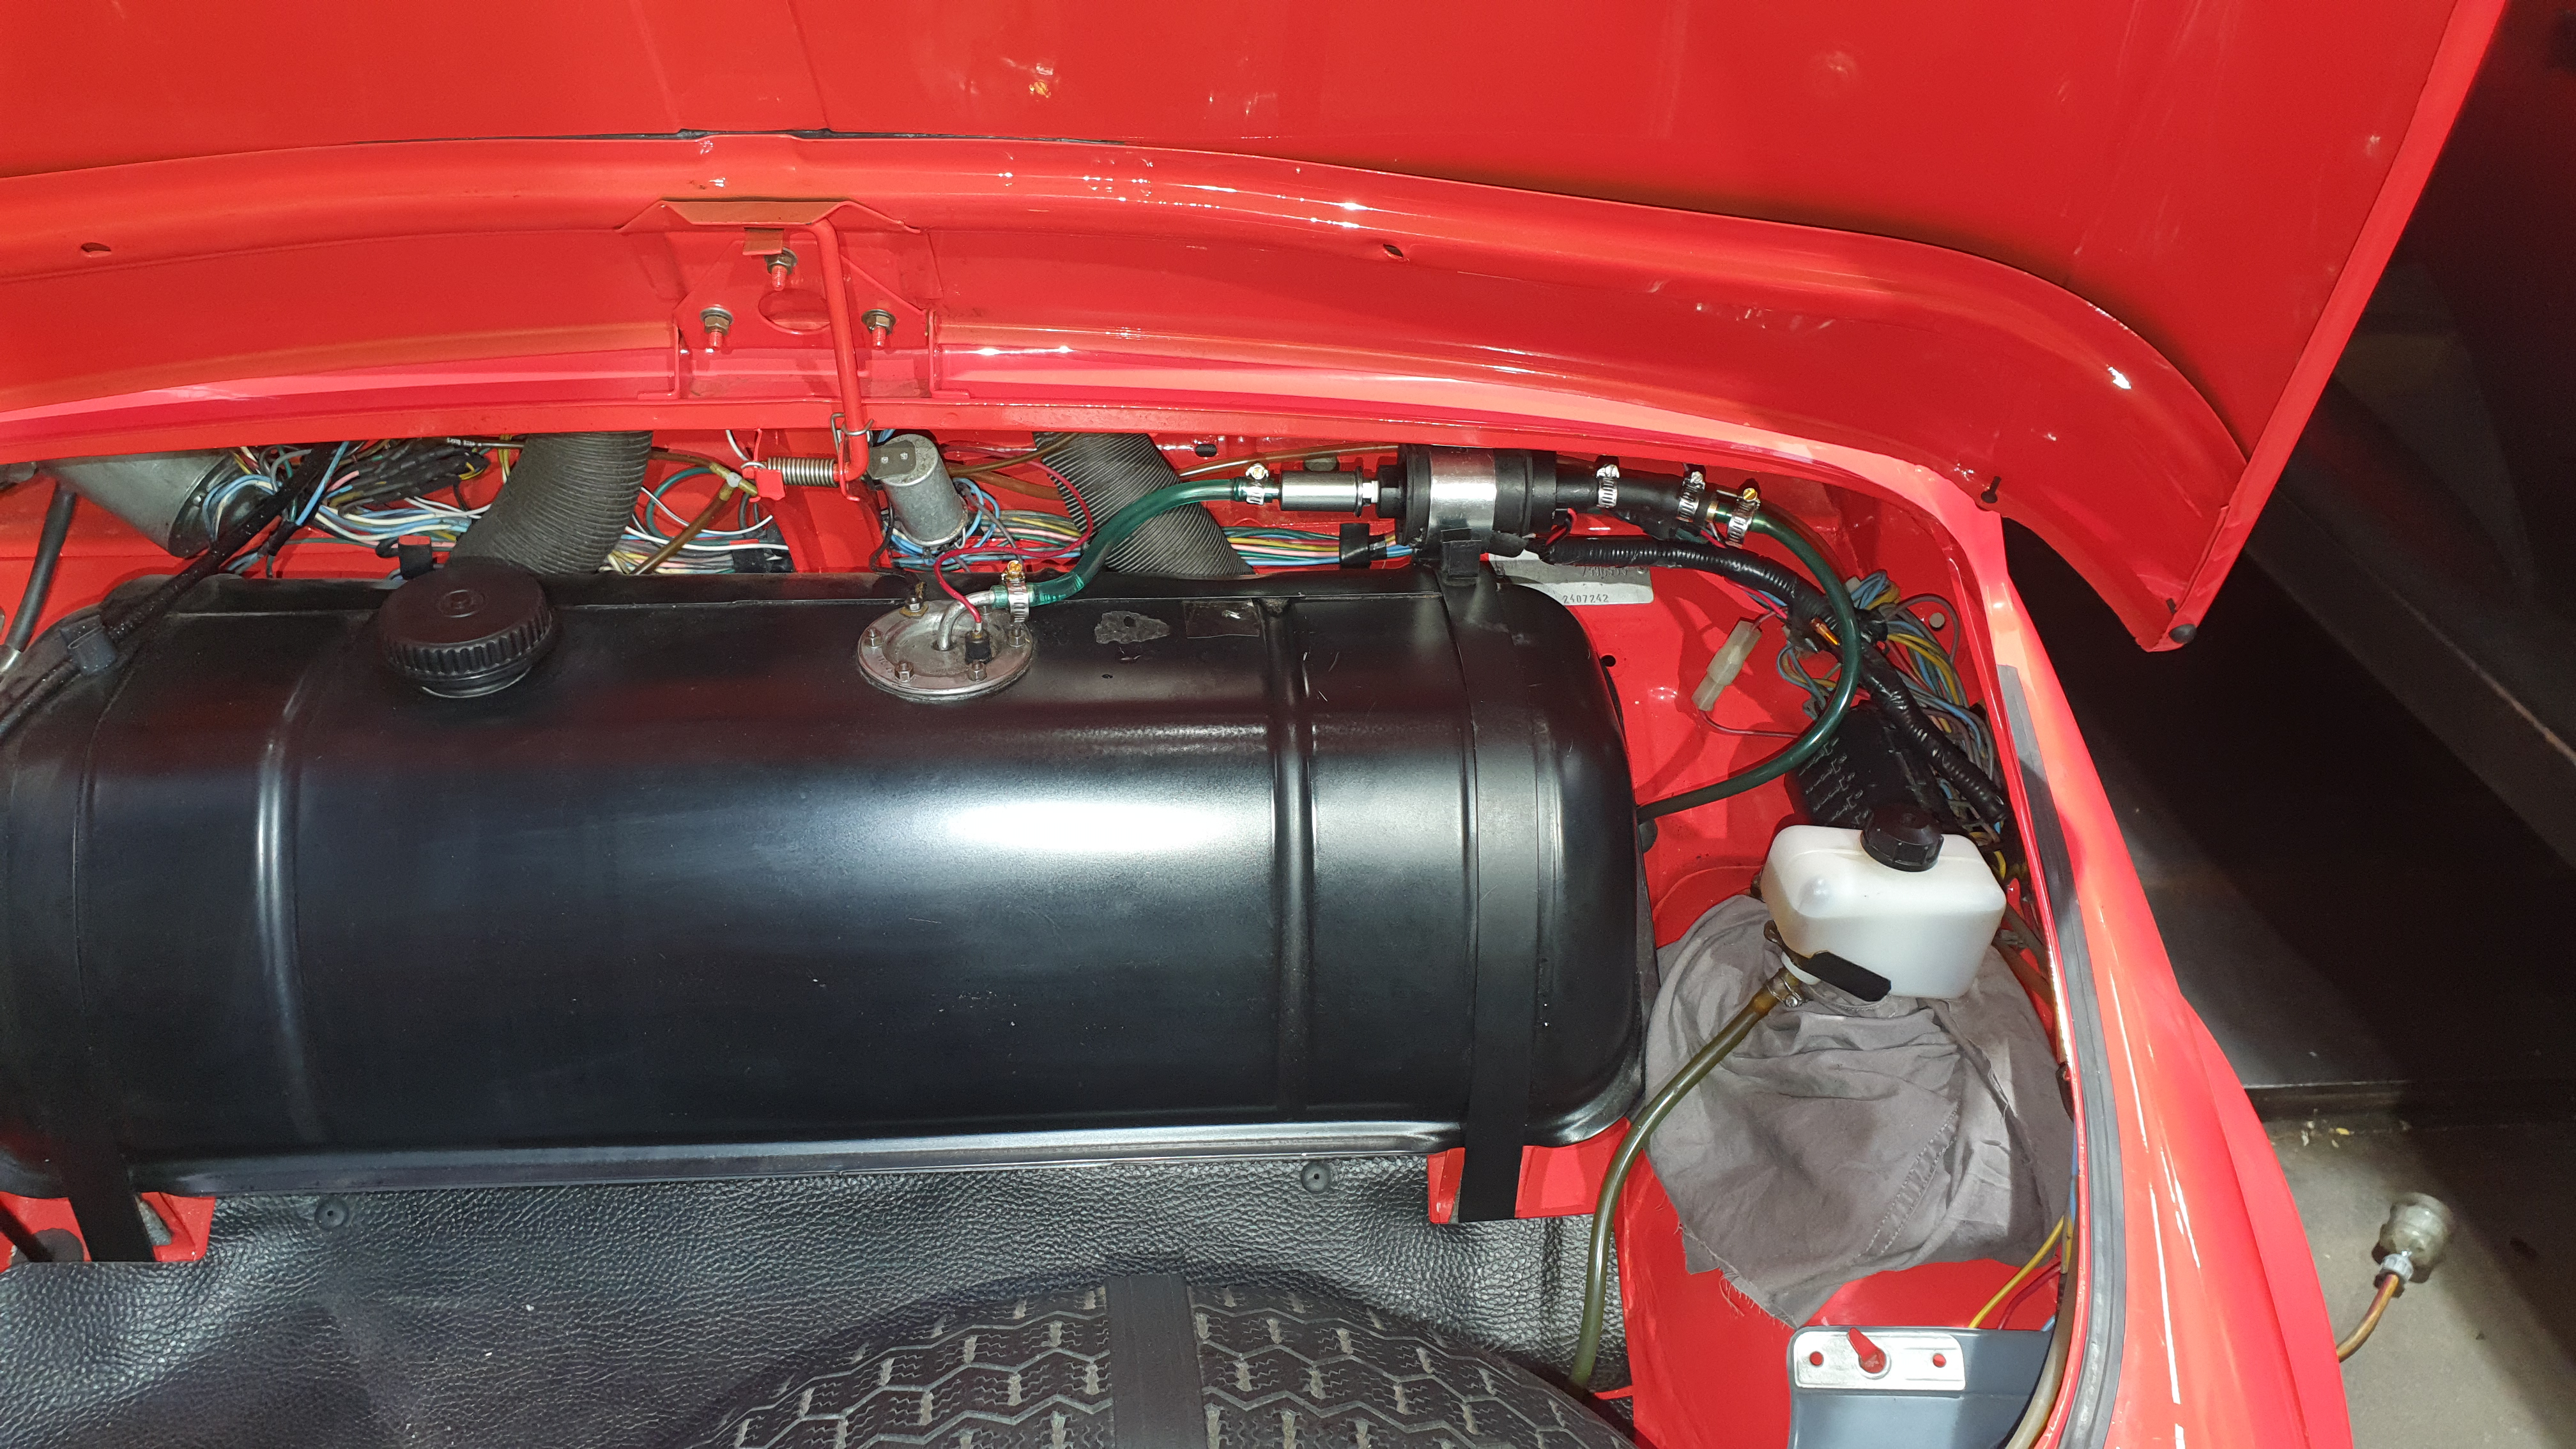
A "DERALE Performance" 2.5psi electric fuel pump was small and solved any future fuel delivery issues.

The finished product ended with the exhaust being the only thing not keeping this 650cc a secret.
The Result
Even though we had never sat in one let alone driven one, it was a massive surprise when it came time for the road test. Besides the pedals being extremely close together, it was great to drive. Power was nice and smooth. Acceleration was no issue no matter what gear we selected. The car pulled up the hills with absolute ease and at every turn people would just stop and stare. The Fiat 500 was never fitted with a radio, but now, it wasn't needed as the sound of the exhaust, even though it wasn't load like the V8's we love, was very enjoyable and let off a slight burble each time you released the accelerator to select the next gear. During that test drive, we realised we too had fallen in love with this car. It is tiny, and you couldn't fit too many of your friends in it, but you could certainly enjoy it, on your own. The big test was going to be Rob's first drive and we were eager to see his reaction. He was gone for no more than 15minutes and as he pulled back in the driveway, we could see him laughing and then heard it as he shut off the engine. His laughter almost uncontrollable and we waited suspensfully for him to tell us what was so funny. Finally he said "this thing is amazing, I can actually overtake people now", still struggling to stop himself laughing he then added, "i Don't need my other cars anymore". What a relief. He was extremely happy with the final product and we were too. It was certainly a different project to what we were used to and yet this Fiat 500cc engine rebuild was an absolute success. Would we do another? Yes, of course. With the knowledge we have gained from this build, the next one will be done in less than half the time. We would like to thank Rob for his patience, his gratitude, his amazing attitude and friendliness throughout this project. We also thank you for trusting us with your pride and joy. Enjoy that beautiful little beast.


 Looking back, roughly 15 years or so ago, diesel engines were commonly and widely used as the work horse engine of choice. While sometimes rather sluggish, noisy and more suited to a beat up old work ute or truck, they had plenty of torque which enabled them to haul massive amounts of weight without too much strain.
Their other advantage was the milage per full tank you could get out of them, even whilst towing a fully loaded tray. Their downside though, of course is the plumes of dirty black diesel exhaust fumes that they would spew out their tailpipes, filliing the atmosphere with Carbon Monoxide (CO), Hydrocarbons (HC), Nitric Oxide and Nitrogen Dioxide (NOx), and soot or Particulate Matter (PM). All of which have been scientifically proven to cause cancer in humans.
Now fast forward back to today and what you may not know is that the current Common Rail Diesel (CRD) engine is far more complicated and sometimes much less reliable than before. This is due to tighter emissions laws which have been put in place over the years to help reduce the amount of harmful emissions caused by vehicle engines of all fuel types. Obviously diesel requiring the most technology change than petrol or gas. This is great for our population but a lot of times can cause grief for the owners of modern day diesel owners.
Looking back, roughly 15 years or so ago, diesel engines were commonly and widely used as the work horse engine of choice. While sometimes rather sluggish, noisy and more suited to a beat up old work ute or truck, they had plenty of torque which enabled them to haul massive amounts of weight without too much strain.
Their other advantage was the milage per full tank you could get out of them, even whilst towing a fully loaded tray. Their downside though, of course is the plumes of dirty black diesel exhaust fumes that they would spew out their tailpipes, filliing the atmosphere with Carbon Monoxide (CO), Hydrocarbons (HC), Nitric Oxide and Nitrogen Dioxide (NOx), and soot or Particulate Matter (PM). All of which have been scientifically proven to cause cancer in humans.
Now fast forward back to today and what you may not know is that the current Common Rail Diesel (CRD) engine is far more complicated and sometimes much less reliable than before. This is due to tighter emissions laws which have been put in place over the years to help reduce the amount of harmful emissions caused by vehicle engines of all fuel types. Obviously diesel requiring the most technology change than petrol or gas. This is great for our population but a lot of times can cause grief for the owners of modern day diesel owners.

VW - Common Rail Diesel engine found in many of their various models.
So why are they so problematic now? Well, to put it simply, it is the result of these new pollution saving designs combined with short trips. Driving to the shops or school and then home, no more than a 15 - 20 minute drive, if that, constantly. This is why we see them suffer. You see, the thing you won't be told by your car salesman when buying your new work ute or family SUV is that while the amazing milage they can do on a single tank is roughly 1000km or more and the awesome power/performance they have far surpasses those produced more than 10 years ago, they really aren't as useful to you in the long run if you're not going on long trips at least once a week or using a freeway for up to 30 minutes at a time whilst holding a constant 100km/h the whole time, as this is roughly what the Diesel Particulate Filter (DPF) requires to "regenerate" itself so that it doesn't block up. Similar driving conditions must be met in order to keep the Exhaust Gas Recirculation (EGR) from becoming so blocked that the engine chokes on its own carboned soot creation. Looking closer at EGR systems. What they do, how they cause owners headaches, how we can help if you're faced with an EGR issue and a guide to help reduce further soot buid up.
EGR - Exhaust Gas Recirculation.
Diesel engines, as mentioned above, produce many toxic fumes and in order for manufacturers to be allowed to continue to produce diesel vehicles, they had to implement an exhaust gas recirculation setup to help reduce the level of harmful chemicals being emitted. EGR is a device that acts almost like a tap and diverts exhaust gasses containing unburnt diesel fumes back through the intake of the engine and into the combustion chamber allowing it to be used again. This is a great idea in theory, and works great on petrol engines, but on a diesel engine, it can be self destructive! Due to the higher combustion temperatures in diesels, larger clearances between pistons, piston rings and bores are required to accomodate for the expanding and contracting of these parts which is why these motors are prone to excessive blow-by. Blow-by is the result of pressure building up within the crankcase by the downward force of the pistons. This pressure forces air back up the cylinder and past the gaps between the piston rings and cylinder wall and into the intake chamber. This blow-by contains traces of engine oil and as the oil gets older, it gets dirtier, heavier and is also diluted with diesel fuel. (If diesel fuel sits in the tank for an extended period of time it builds moisture and forms an algae on the tank walls that also speeds up soot build-up). Combine this mixture in the intake and then add extremely high exhaust temperatures from the recirculating exhaust gasses and you have created diesel "soot". With the high exhaust temps, the oily blow-by is baked onto the walls of the intake system and over time, you can imagine what happens.
A heavily blocked EGR valve compared to a new one.
Once your intake/EGR valve is blocked to the point that intake air is restricted to a minimal flow the engine can no longer breathe, it will in most cases illuminate the "Check Engine" light and power will be heavily restricted by the ECU (Limp Home Mode) as a safety measure to prevent further damage. In other cases, it may feel like it's misfiring and possibly blowing a heavy trail of thick black smoke. This is the point where we must now dismantle the air intake manifold and EGR system to inspect the extent of the blockage. All the soot build up has to be manually scraped out by hand before being chemically cleaned in a parts washer. In severe cases, we have had to replace EGR valves and EGR coolers as they were unable to be cleaned to a satisfactory state. Other cases, depending again on severity and also Make/model of vehicle, we have had to remove and clean intercoolers in order to get correct intake pressure readings. With all the parts cleaned or replaced if necessary, they are refitted using new gaskets or sealants as required. With the vehicle running again, we then spray an Diesel Intake Cleaning additive through the whole intake side whilst holding the engine at a steady 2000rpm. This ensures that any further blockages or soot in the intake chamber and cylinder head passages are removed. The intake cleaning additive is accompanied by a bottle of CRD Diesel Fuel system cleaner in the fuel tank. This helps reduce moisture in the fuel and breaks down any algae already formed inside the tank. Any previous fault codes are cleared before the vehicle is road tested and then checked again via a diagnostic scan tool for any further faults and correct readings from the EGR.
We use and sell additives by PowerMaxx which have been tested and proven to have great results. These tests have been carried out in front of us in our workshop by BlueCHEM/PowerMaxx representitives.

Blocked cylinder head intake ports of a CRD engine, showing soot build up and blockage of intake flaps.
Preventing further issues consists of the following:
- Long Freeway/Highway driving. (This includes a stretch of road allowing you to travel at a minimum of 80km/h for at least 30min without interruption).
- Regular servicing intervals using high quality, Low Ash, Oil. (We recommend intervals of no longer than 10,000km between servicing)
- Regular fuel filter replacement (Usually required at intervals of no more than 20,000km). Added protection from algae contamination is an option by fitting an aftermarket secondary diesel fuel filter kit.
- Try keeping your tank above half when possible and add a bottle of BlueCHEM Common Rail Diesel Fuel System Cleaner once a month to keep the entire fuel system free from contamination.
- Avoid the use of EGR blanking plates and any online EGR delete kit in the form of a plug & play AFM wiring as these are highly illegal and will incur big fines if found out by the EPA.

For further information or to purchase PowerMaxx additive products, please phone, C&S Service Centre on (03) 9484 6806.
In Victoria, a Roadworthy Certificate ( RWC ), also known as a Certificate of Road worthiness or Roadworthy Inspection, is required when a vehicle is sold or purchased, if a used vehicle is to be re-registered or, in some cases to clear a Vehicle Defect Notice.
C&S Service Centre, can inspect, repair (if necessary) and provide Roadworthy Certificates (RWC) in Preston for all makes and models of road driven cars, vans, 4 Wheel Drives and utes. Some restrictions do apply so please call for further info.
C&S Service Centre are VIC Roads licensed Vehicle Testers and specialise in providing a RWC for prestige vehicles including Mercedes Benz, BMW, Lexus, Audi and Volvo. All other makes also welcome including Holden, Toyota, Ford, Honda, Mitsubishi and more.
Book your vehicle today! Call (03) 9484 6806.
We provide Roadworthy Certificates servicing the Preston, Thornbury, Northcote, Fairfield, Reservoir and surrounding areas.
*NOTE* Prices start at $220.00 Inc. GST for small, medium and large family cars. Prices may increase for larger vehicles.
Hi there! I'm a miner by day, aspiring actor by night, and this is my website. I live in Kalgoorlie, have a great dog named Red, and I like yabbies. (And gettin' a tan.)...or something like this:
The XYZ Doohickey Company was founded in 1971, and has been providing quality doohickeys to the public ever since. Located in Gotham City, XYZ employs over 2,000 people and does all kinds of awesome things for the Gotham community.As a new WordPress user, you should go to your dashboard to delete this page and create new pages for your content. Have fun!
 Quite often mistaken for a dead vehicle battery, the w204 bodied Mercedes-Benz C-class suffers from a fault that will unfortunately leave you stranded at the best of times.
Quite often we get a phone call from a customer telling us their car won't start, even after replacing the battery.
While the fault is not as common as the dreaded timing rattle fault, (common on petrol 4 cyl models), it is something we have seen many times over the last 3 - 4 years. The first few times we had forwarded the customer on to dealerships, where our poor customers were charged large amounts of money to replace a part, that should not only have not failed to begin with, but were replacing these steering lock actuator modules with new ones that were exactly the same and not modified to ensure they won't fail again.
Once noticing that this was an issue we were going to start seeing more of, we needed to look into the fault to help save our customers a fortune and to help get their cars running perfectly again within a short period of time.
Quite often mistaken for a dead vehicle battery, the w204 bodied Mercedes-Benz C-class suffers from a fault that will unfortunately leave you stranded at the best of times.
Quite often we get a phone call from a customer telling us their car won't start, even after replacing the battery.
While the fault is not as common as the dreaded timing rattle fault, (common on petrol 4 cyl models), it is something we have seen many times over the last 3 - 4 years. The first few times we had forwarded the customer on to dealerships, where our poor customers were charged large amounts of money to replace a part, that should not only have not failed to begin with, but were replacing these steering lock actuator modules with new ones that were exactly the same and not modified to ensure they won't fail again.
Once noticing that this was an issue we were going to start seeing more of, we needed to look into the fault to help save our customers a fortune and to help get their cars running perfectly again within a short period of time.
Mercedes-Benz W204 Bodied C-Class
It didn't take long to find a great team interstate who could not just repair these units, but bring them to a higher quality than that offered by Mercedes-Benz genuine replacement parts. They would also carry out the repair and organise return shipping of the part at a fraction of the cost being quoted for a replacement unit. This is exactly what we were offering our customers and were saving them money and stress. The only downside to this was the turnaround time. By the time we removed the steering shaft assembly, separated the steering lock actuator module and key reader, sent them away for repair and reinstalled upon arrival after being repaired, it meant customers were waiting up to a week to have their car back. Most were happy to wait the required time due to money savings but it started being a hassle in the workshop, as cars would be sitting there for days, taking up room and unfortunately slowing us down.
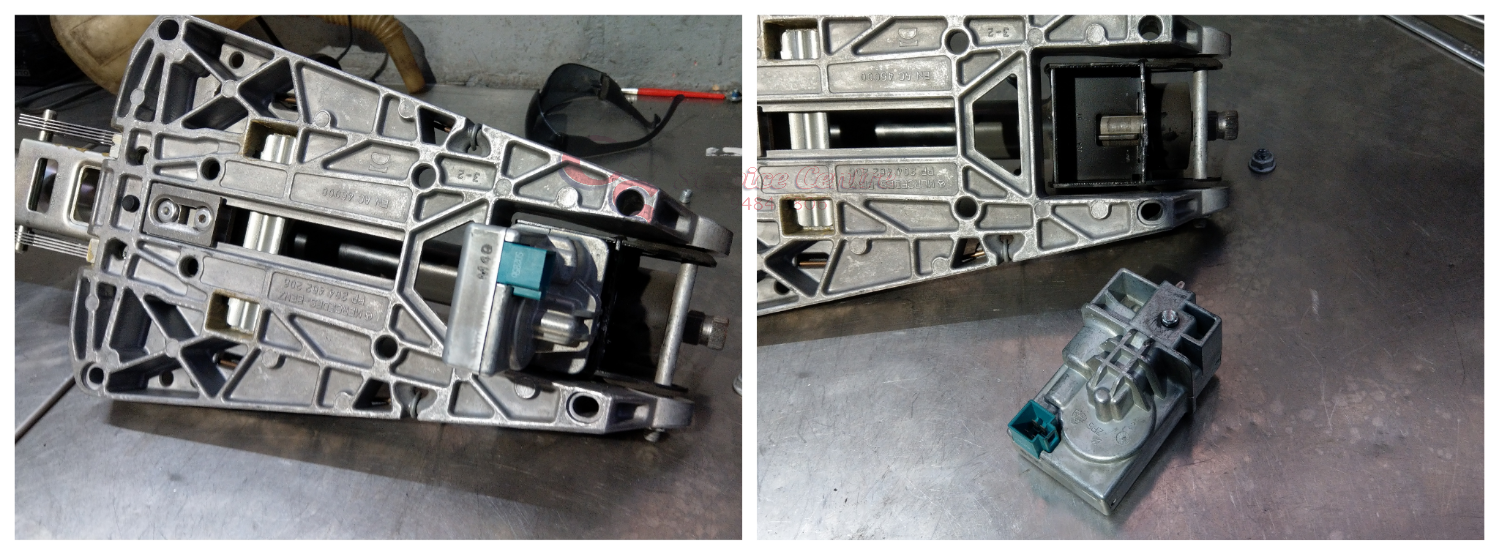
A steering column assembly removed and the lock actuator module separated.
It was back to searching for a solution and we're happy to say, we have found one and have been successfully repairing this fault in house at our very own workshop. Unfortunately the car will still have to be towed in to us, but once it arrives, we will only need it for 1 - 2 days to complete the repair. The process includes removal of airbag, steering wheel and steering shaft components. We then repair the steering lock and reassemble without having to send any parts away. Both the repair and workmanship are covered by a warranty and we will endeavour to have you back on the road in a short period of time. Again saving you money.

Before reassmbly.

A completed steering lock repair.
What variants of w204 bodied C class are affected? Unfortunately all variants are prone to steering lock actuator failure. From the base model C200 right up to the AMG C63. Coupe, sedan and wagon. How can I tell if my steering lock actuator is at fault? What symptoms should I look for? This fault can show some different symptoms, but the main problems to look for are as follows:
- Key stuck in ignition and won't start vehicle or even turn on ignition.
- In some cases, steering will be locked. In other cases, the steering won't lock and steering wheel can be turned in either direction, lock-to-lock.
If you have any questions in regards to this fault, or you wish to book your vehicle in for repair, please phone
C&S Service Centre on 9484 6806 during business hours Mon - Fri.
Mention this blog and you will be passed on to the right person who can help answer all your questions.
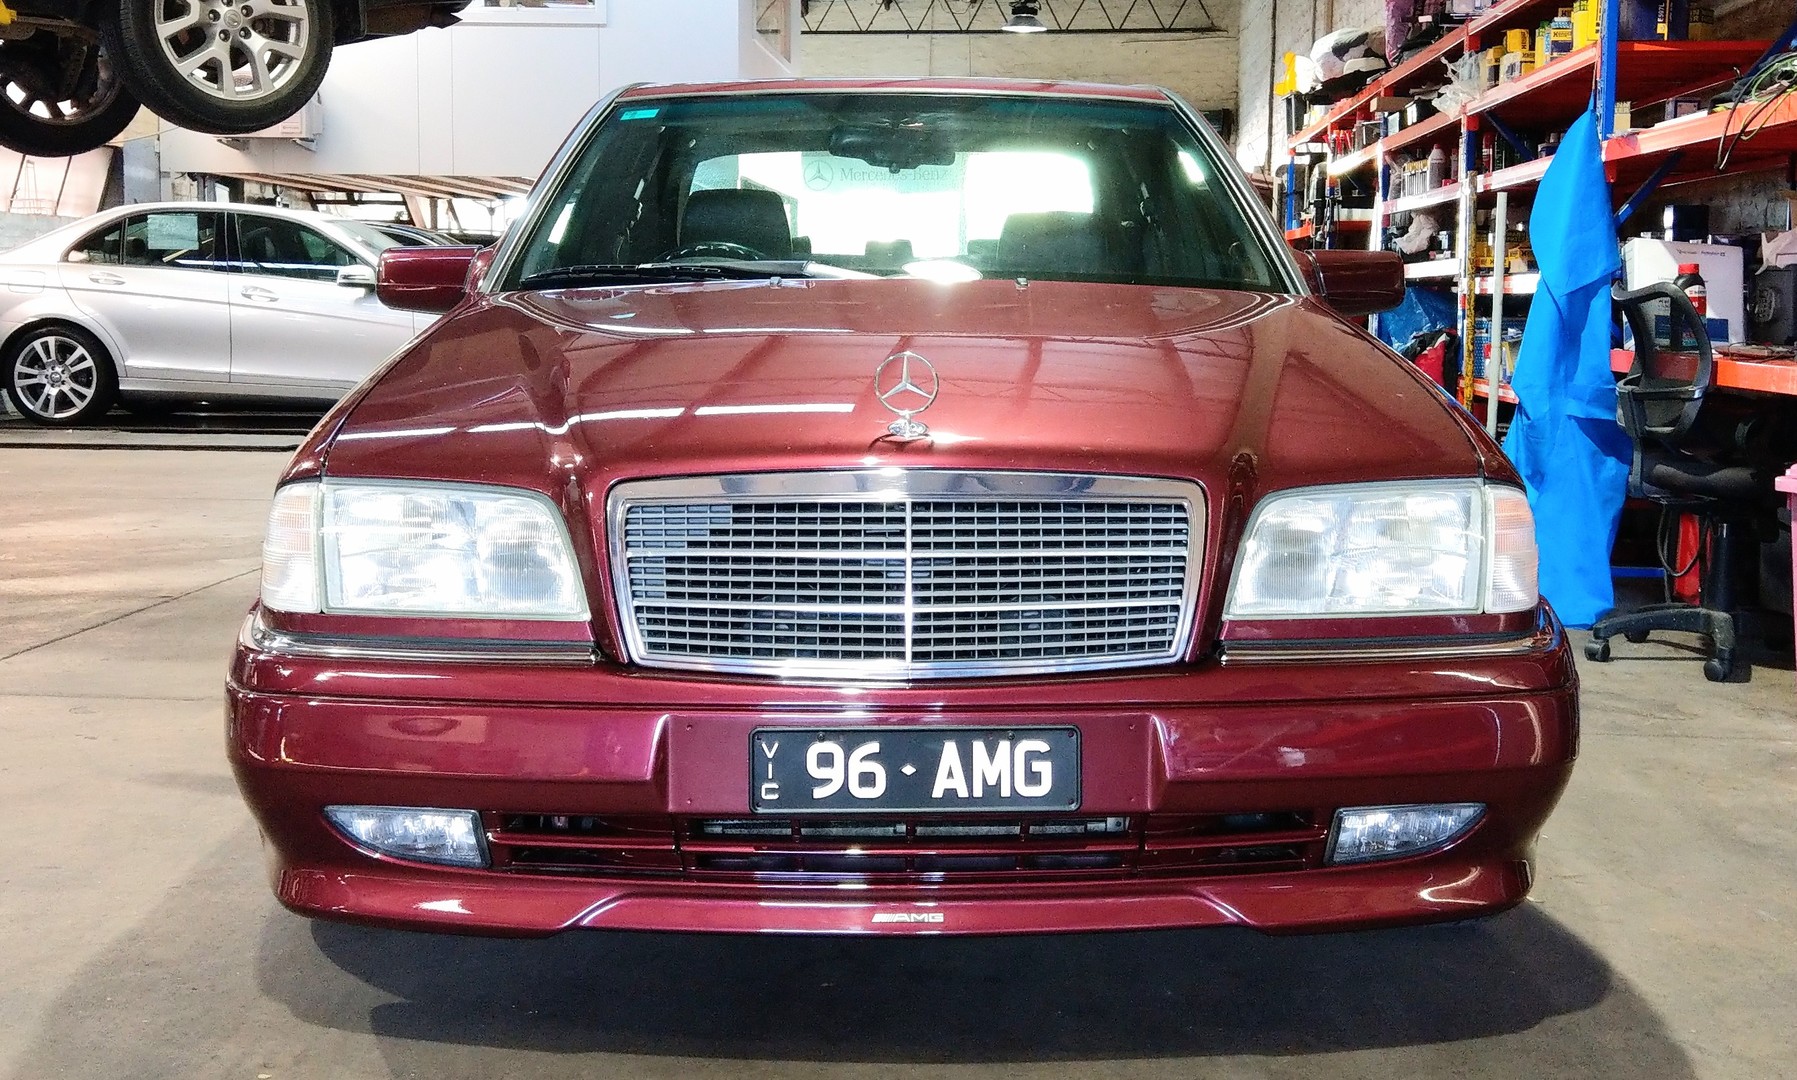
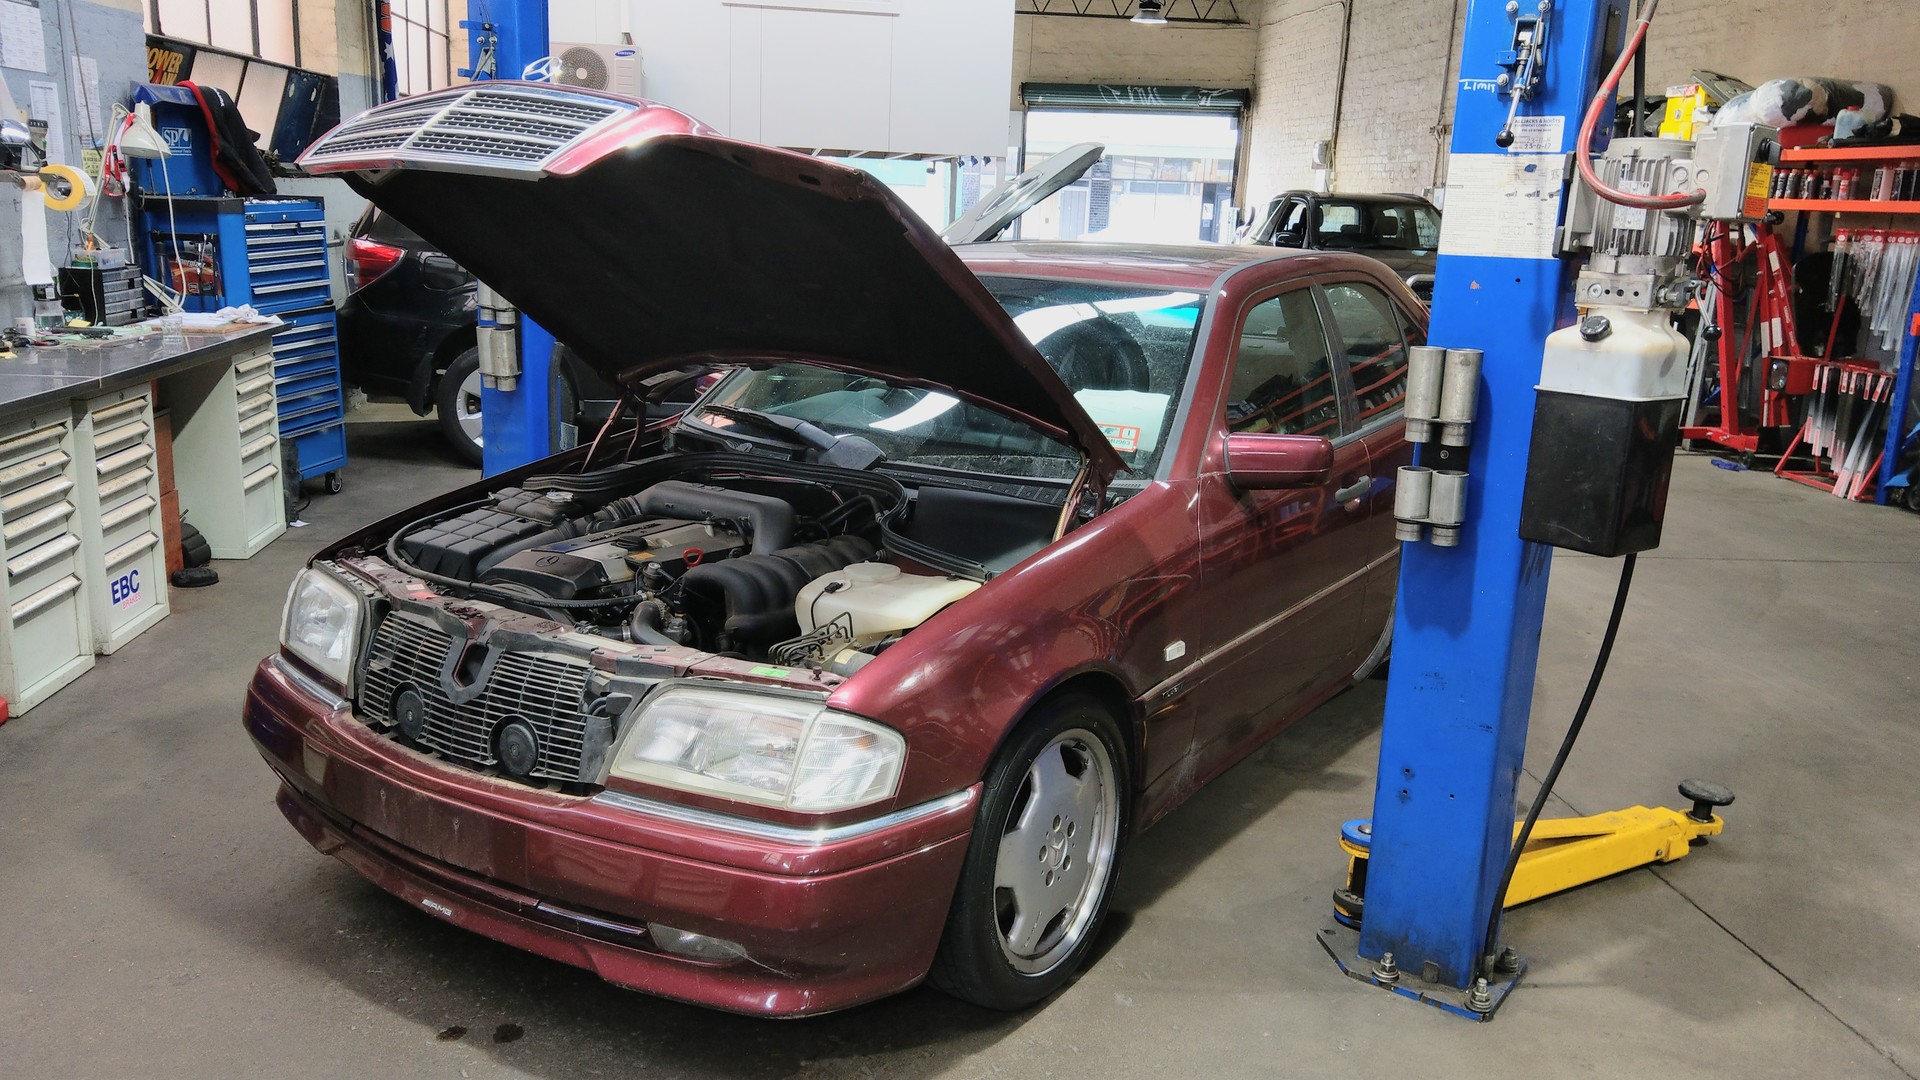
 When a loyal customer of ours, David, showed up in his newly acquired 1996 Mercedes-AMG w202 C36, we couldn't wait to get stuck into restoring it's original looks and performance.
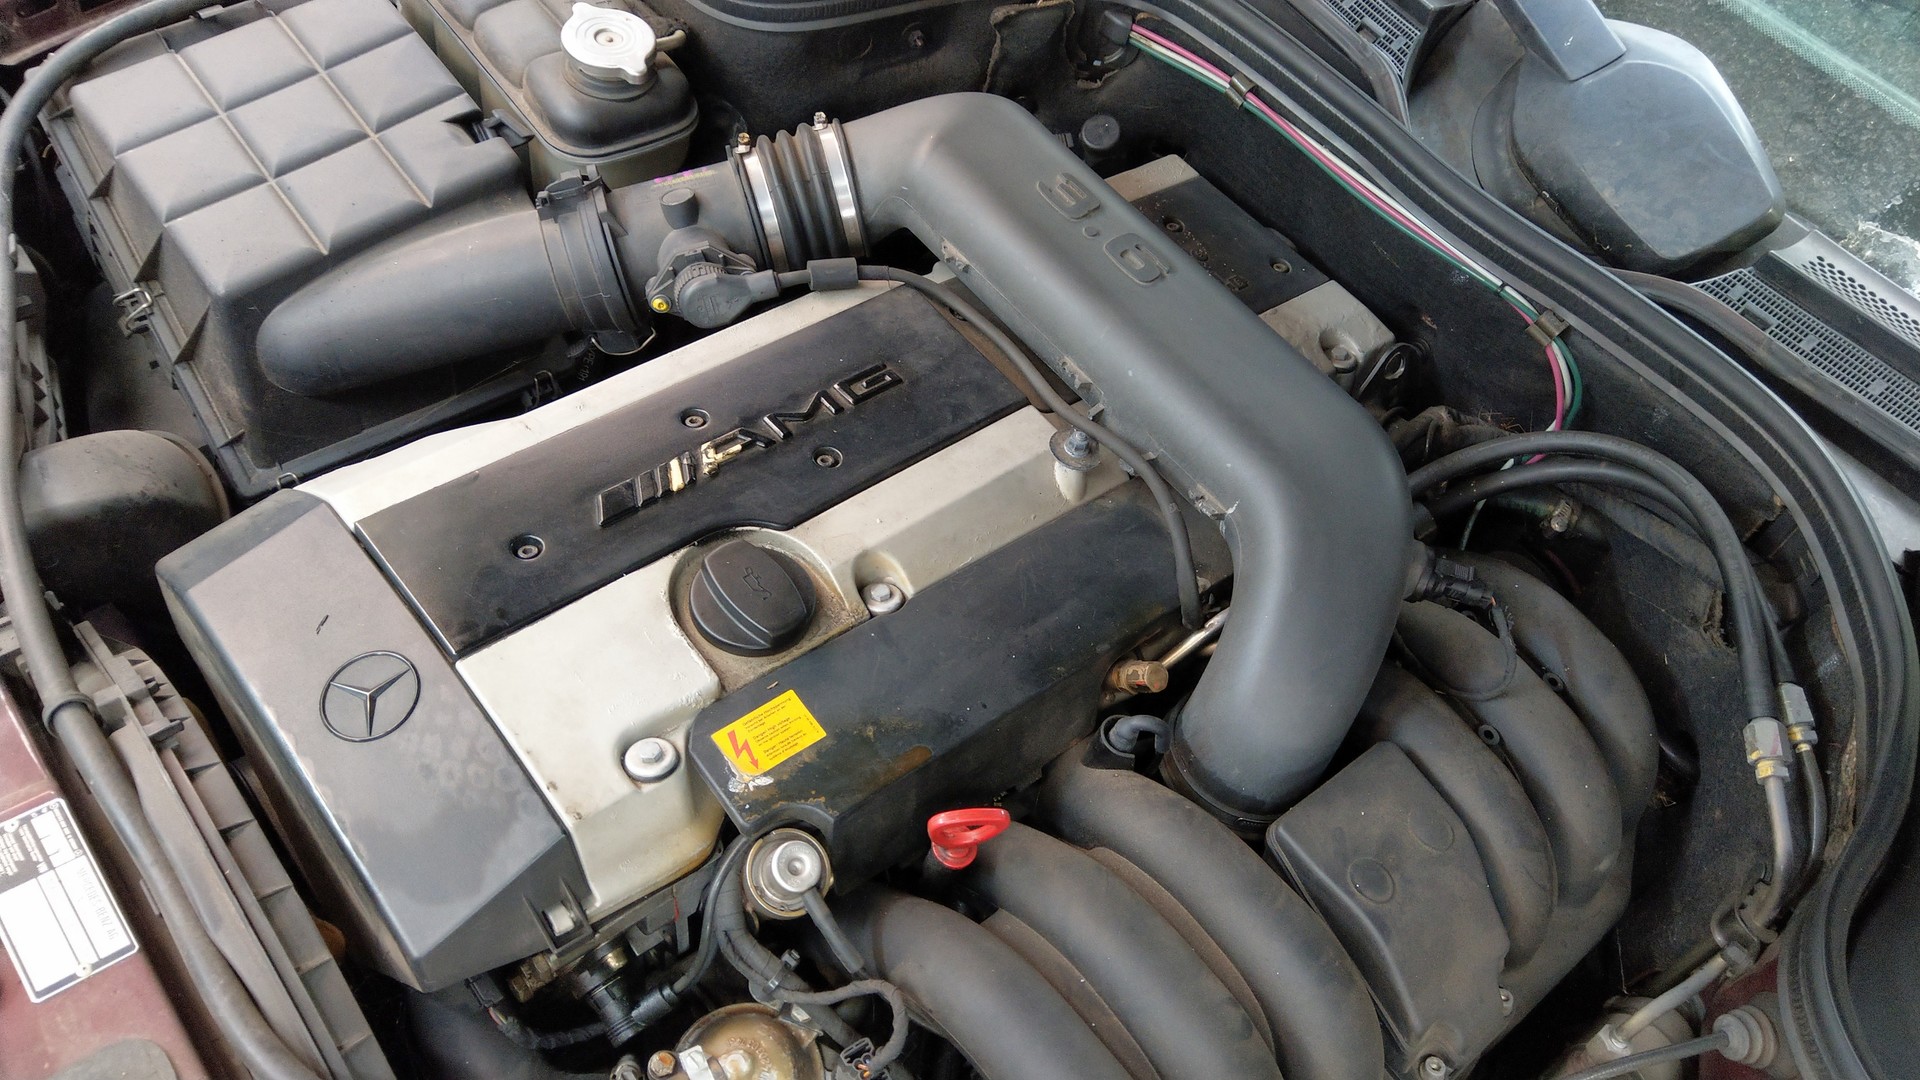
Despite the gorgeous Mercedes 'Ruby Pearl Metallic' paintwork looking dull and covered in inches of dust, and the sound of the heavily AMG modified M104 engine clearly only running on 4 of its 6 cylinders, we were still in awe of this classic beast and immediately saw it's potential!
For those of you who don't know about the W202 Mercedes AMG C36, you won't understand what makes this car special. So let's start by giving you a quick run down on this classic beast...
Prior to 1990, Mercedes-Benz and AMG were seperate companies, with AMG being an aftermarket performance name responsible for completely remaking Mercedes-Benz vehicles into performance machines. In 1990, AMG signed a contract with Daimler-Benz which joined the two companies, meaning Mercedes-AMG vehicles were now able to be purchased straight from a dealership with an AMG package factory fitted and covered under a new car warranty.
When a loyal customer of ours, David, showed up in his newly acquired 1996 Mercedes-AMG w202 C36, we couldn't wait to get stuck into restoring it's original looks and performance.
Despite the gorgeous Mercedes 'Ruby Pearl Metallic' paintwork looking dull and covered in inches of dust, and the sound of the heavily AMG modified M104 engine clearly only running on 4 of its 6 cylinders, we were still in awe of this classic beast and immediately saw it's potential!
For those of you who don't know about the W202 Mercedes AMG C36, you won't understand what makes this car special. So let's start by giving you a quick run down on this classic beast...
Prior to 1990, Mercedes-Benz and AMG were seperate companies, with AMG being an aftermarket performance name responsible for completely remaking Mercedes-Benz vehicles into performance machines. In 1990, AMG signed a contract with Daimler-Benz which joined the two companies, meaning Mercedes-AMG vehicles were now able to be purchased straight from a dealership with an AMG package factory fitted and covered under a new car warranty.
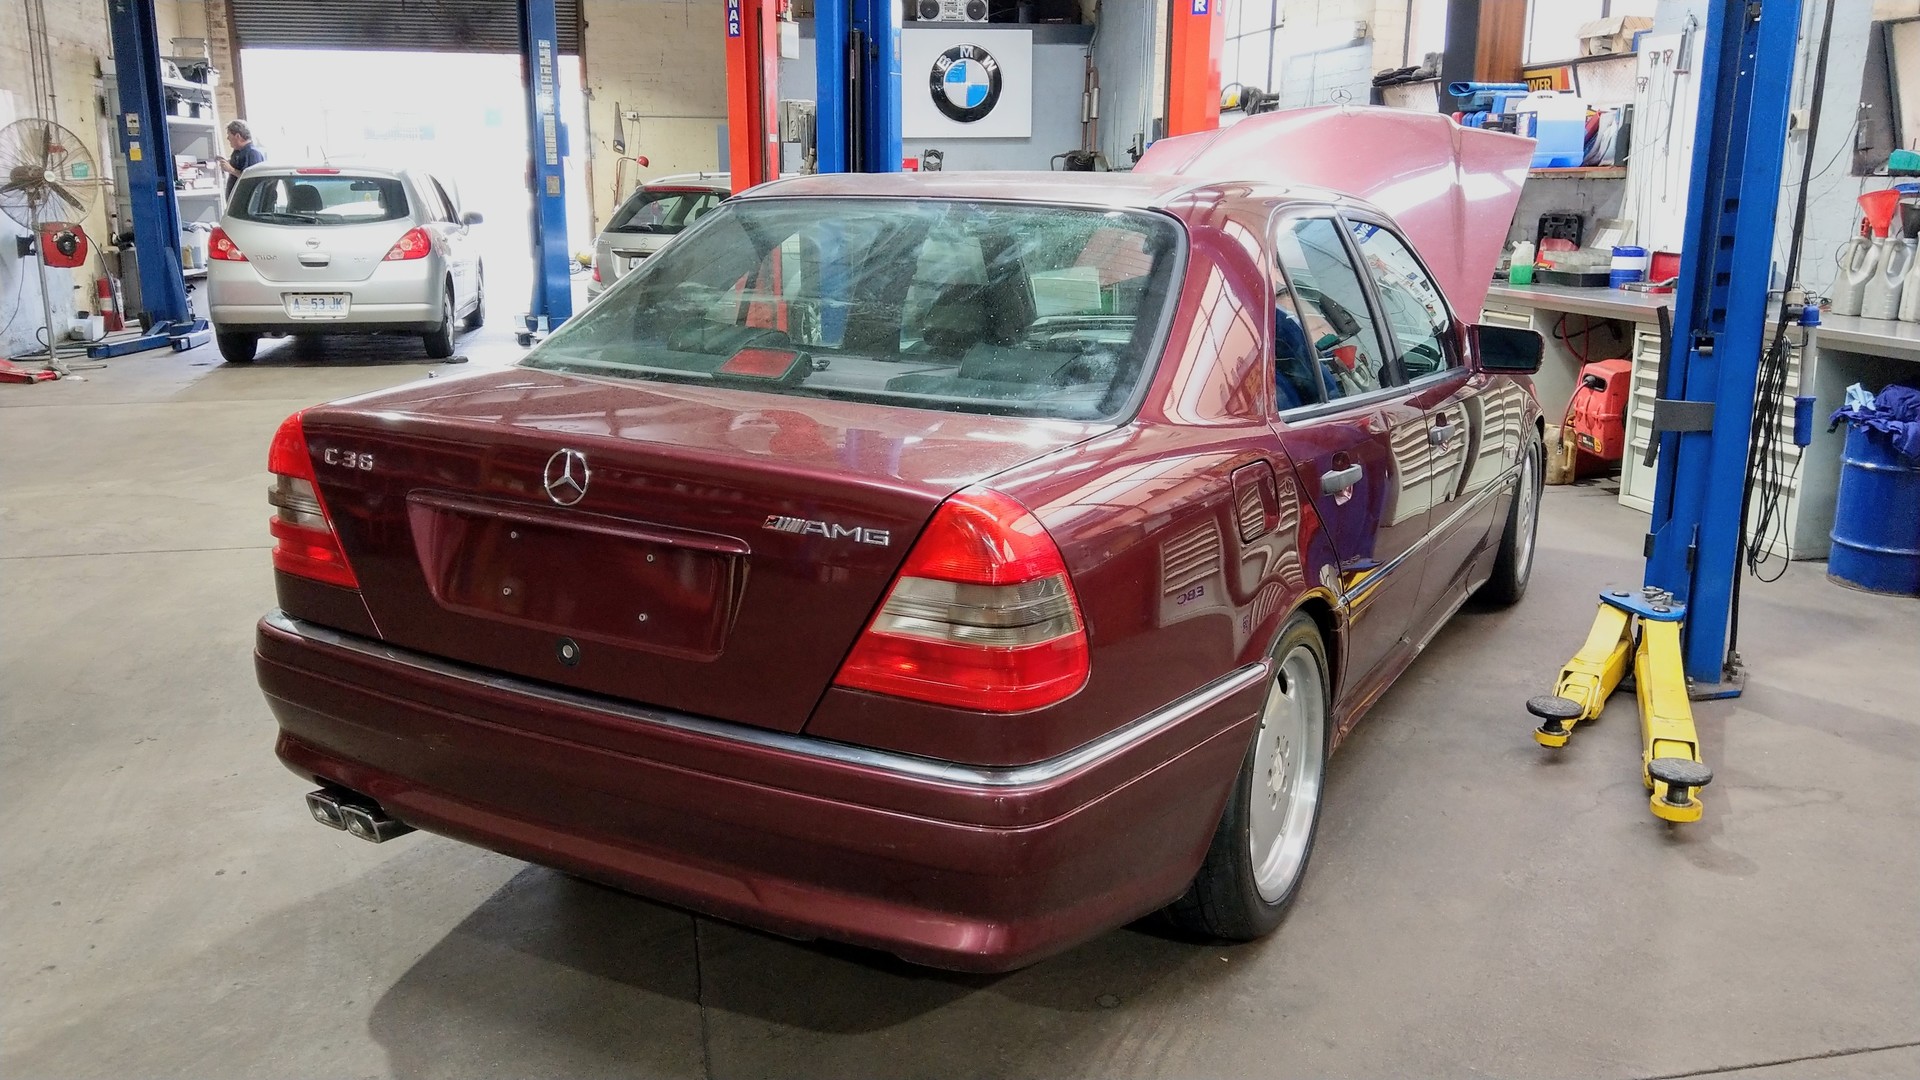
In 1995, the first Mercedes-AMG joint operation was confirmed and finalised and it would be in the form of a C-Class sedan. With a heavily modified M104 In-line six cylinder engine and a host of other goodies including sports body kit and carbon fibre inserts, this car was produced to counter the BMW M3. With a power output figure of 206 kW and 385 N-M of torque, from a six cylinder engine, meant this was an amazing machine. Especially considering that Australian sports cars such as the HSV Clubsport was only making 185 kW out of a 5litre V8 engine. What makes the C36 more special, is the fact that it was also the first AMG that we could purchase here in Oz as prior to this, AMG packages were only available in Germany. But with a price tag of more than $140,000 AUD new, it's no surprise that only 70 or so were ever ordered and delivered to Australia. So they're not something you get to see everyday.
So now you know a bit more about the C36, you can see why we were so interested in this unregistered, rough running old car. It's because we knew what we were looking at and we could see its potential. It had been sitting under a tree in the front yard of a house since the original owner had passed several years ago. A friend of David's had told him about how he drove past it all the time once he had learnt David was looking to purchase one, and after knocking on the door and speaking to the family of the deceased, a price was agreed on and David drove it straight to our door on our first day back for the year in January. David gave us a few simple instructions... Get it looking great, get it running great, replace anything that's missing and get it done by April. April being the Mercedes-Benz Club of Victoria concourse event. We accepted the challenge and got straight to it.
First thing to do was getting it washed and cleaned, inside and out. This was when we discovered how bad the condition of the exterior really was. Almost every panel was dented or scratched and every piece of the body kit had paint flaking off it. Under the bonnet had seen better days too, with the engine misfiring and the covers had been badly painted with a $2 black enamel, straight over the AMG logo. The interior however was in better shape and needed minor attention. Using a paintless dent repairer, 99% of the body was straight again and a cut & polish removed most of the scratches, but the body kit really needed to resprayed due to the bad scratches and flaking. But before it could go anywhere, the mechanical side of things had to be inspected and repaired. The car received a host of new parts including suspension bushes, ball joints, steering components and brake parts. A major service including plugs, leads, filters and all fluids were replaced before diagnosing and repairing the misfire with coils. Now the car was running as good as new and drove the same way, we sent it to the panel shop for some fresh paint. The car was now shining, but still needed some work. The genuine staggered AMG wheels were sent away to be refurbished and the engine bay was cleaned whilst the engine covers were sanded right back and correctly painted before being finished with a new AMG decal logo. Now the car was perfect and with the final wash and detail completed, we were happy to return the car to David before the deadline. The smile on his face was all we needed to see to know he was happy with the final outcome. We wish you all the best with your beautiful machine David. The C&S Service Centre team.